Configuring the System for Best Performance
It is a common scenario for system administrators to request the absolute best performance out of their Sunlight.io system. This section describes how to configure the best performance mode for VMs, in order to access unparalleled virtual storage and network IOPs in a cluster of nodes.
Achieving 1 Million virtual storage IOPs on Slave Node
Follow the steps outlined in previous sections, for creating virtual networks and datastores. When creating the datastore, please make sure that the following settings are enabled:
-
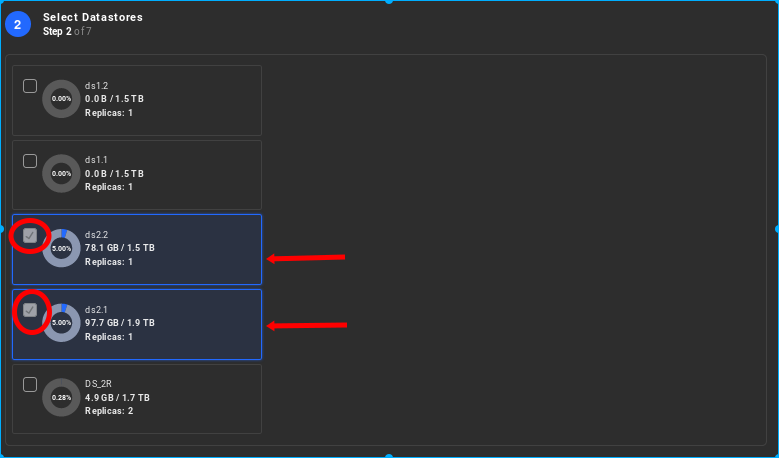
The user must select as many physical drive IOPs (in slave node) as possible, in order to support the required aggregate virtual IOPs. This means that in order to achieve 1 Million virtual IOPs there must be at least as many physical storage IOPs available on slave node. As an example, each physical Intel P4610 NVMe flash drive can provide over 600K READ IOPs when measured under ideal conditions. In order to achieve an aggregate of over 1 Million READ IOPs from a single node there must be at least 2 drives selected in the datastore, as shown in the following image.
-
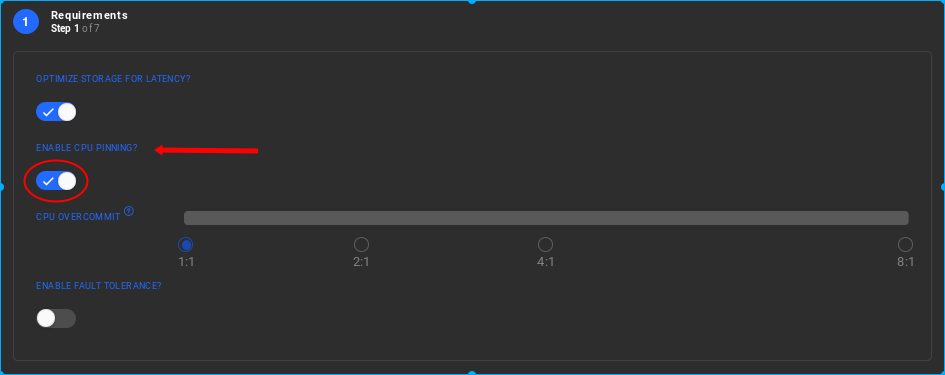
When creating the Resource Group, select the 'CPU Pinning' attribute. This ensures that every virtual CPU is pinned to a physical CPU core and there is a 1-to-1 mapping of virtual CPU cores to physical CPU cores, which also helps in avoiding scheduling and context switch overheads. As a result 'CPU overcommit' attribute is disabled.
-
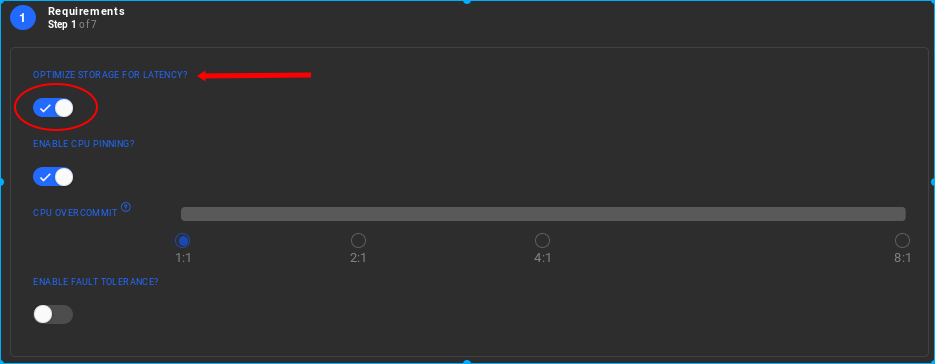
When creating the Resource Group, select the 'Optimise for storage latency' option to ensure that the VMs are always placed on the slave node that provides locally optimal physical storage drives.
-
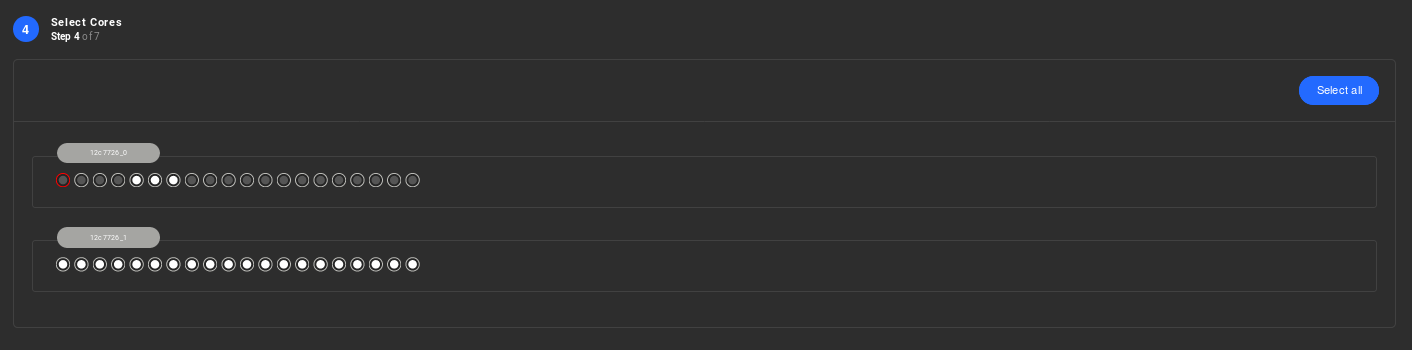
When creating the Resource Group, assign cores from the same CPU socket as the flash drives are physically attached. Nevertheless, you should include 16 cores from the first NUMA node.These cores should be selected following zero (0) based numbering as follows:
1,2,3,7,8,9,10,11,12,13,14,15,16,17,18,19

-Core zero (0) is the one reserved for the Slave Node.
-Cores 4 5 6 should also be available for Nexvisor.So keep them free.
Highly recommended: Please contact Sunlight.io support for help in limiting the reserved cores to one.
A second CPU socket exists on the current Sunlight system model. This could provide an extra performance boost to avoid any CPU memory copy overheads and guarantee best possible performance.
-
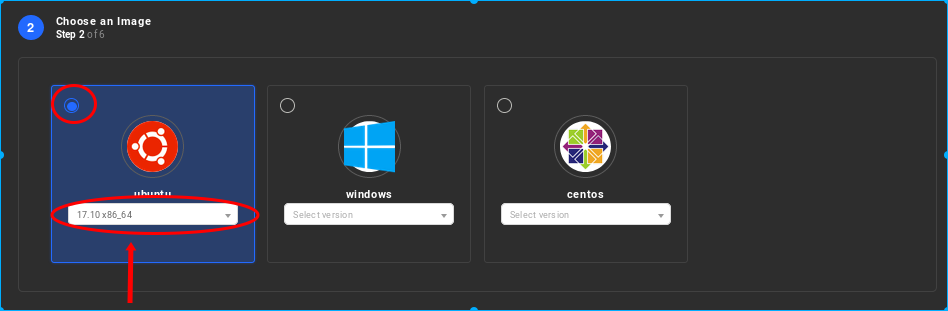
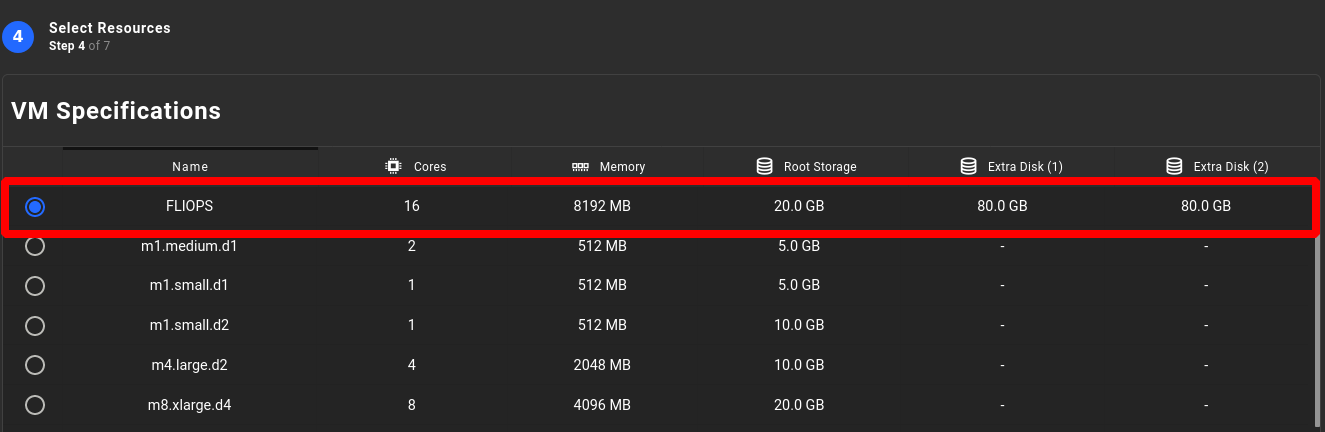
Select the VM distro type to ensure you have the kernel version, on the previous release that is Ubuntu 17.10, with a minimum of 16 cores and a minimum of 8GB of memory. Utilising two (2) extra disk drives of 80GB each for the VM root device is also required.
-
Now login to the new VM and run the following scripts to assist with measuring the best IOPs performance of the VM:
a) login to VM for the 1M IOPS e.g VM_IOS

b) sudo -i (become sudoer user allowing you run the demo)

c) cd /home/ubuntu/perf_slave

d) chmod +x * change the permissions on the files
Also if you are using an HVM template we will need to modify the prep_vm.sh, and randread.fio files and change the device names from (xvda2, xvda3) to xvdb and xvdc
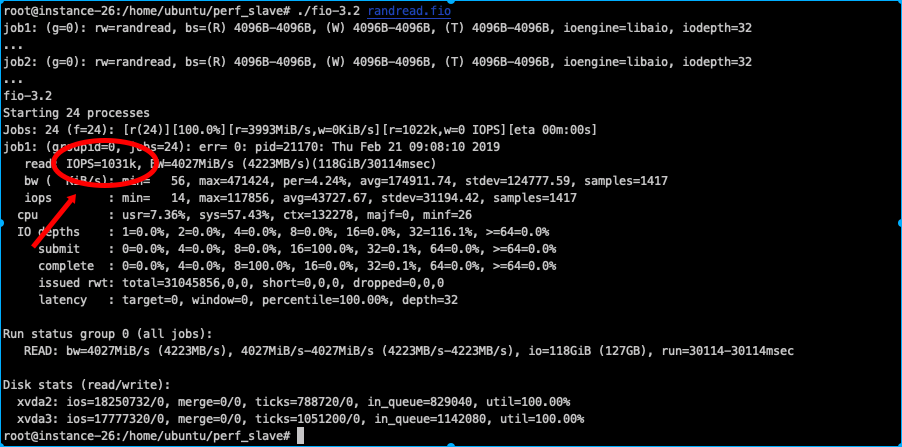
e) Now prepare the VM to run the test: ./prep_vm.sh

f) and finally run the performance fio test: ./fio-3.2 randread.fio
The demanded source files for master and slave node respectively can be downloaded through the following link: Performance Measurements files
The result should be similar to the following screenshot, for 2 combined virtual drives:
Achieving lowest network latency between 2 or more VMs
Certain applications require the lowest latency possible between virtualised workloads, in order to guarantee the best performance of an application. The Sunlight.io platform supports very low latency through the configuration of the following parameters:
-
When creating the virtual networks, ensure that all the physical paths available are selected on the cluster of nodes. This ensures that any VMs communicating across the physical switch have as many paths as possible to traverse.
-
When creating the Resource Group, select the 'CPU Pinning' attribute. This ensures that every virtual CPU is pinned to a physical CPU core. This option helps to avoid scheduling and context switch overheads.
-
When creating the Resource Group, do not select any overcommit settings for CPU resources, since this ensures that there is a 1-to-1 mapping of virtual CPU cores to physical CPU cores.
-
For the ultimate lowest inter-VM network latency performance you can even deploy VMs on the same compute node and even on the same exact CPU socket to ensure there is absolutely no delay introduced in the hardware by communicating across CPU sockets.
-
Select the VM distro type to verify the kernel version, on the previous release (Ubuntu 17.10), with a minimum of 16 cores and a minimum of 8GB of memory coupled with two (2 ) extra disk drives of 80GB .
For taking latency measurements between server VMa and Client VMb instance, you could perform flood ping through the following commands:
    1. sudo su  (become sudoer to be allowed to execute flood ping command )

    2. ping <VMb_IP> -c 10000 -i0 -q
The communication latency (RTT ) between 2 VMs reaches out to approximately 18 useconds.
Achieving highest network throughput between 2 or more VMs
For other classes of applications there may be a requirement to achieve the highest level of throughput between 2 or more virtualised workloads. The Sunlight.io platform allows you to achieve this by configuring the following parameters:
-
When creating the virtual networks, ensure that all the physical paths available are selected on the cluster of nodes. This ensures that any VMs communicating across the physical switch have as many paths as possible to traverse.
-
When creating the Resource Group, select the 'CPU Pinning' attribute. This ensures that every virtual CPU is pinned to a physical CPU core. This option helps to avoid scheduling and context switch overheads.
-
When creating the Resource Group, do not select any overcommit settings for CPU resources, since this ensures that there is a 1-to-1 mapping of virtual CPU cores to physical CPU cores.
-
For the ultimate highest inter-VM network throughput performance. VMs can be deployed on the same compute node or even on the same exact CPU socket, in order to ensure there is absolutely no overhead introduced in the hardware by communicating across CPU sockets.
-
Select the VM distro type to verify the kernel version, on the previous release (Ubuntu 17.10), with a minimum of 16 cores and a minimum of 8GB of memory attached to two (2 ) extra disk drives of 80GB. Note that increasing the number of virtual CPU cores will provide a linear increase of the amount of data transfer that can be achieved between VMs running on the same physical host. Across physical hosts this is more likely to be limited by the external switch and hardware NIC performance.
For acquiring throughput measurements between 2 different VM instances that are attached to the same network and be able to communicate with each other, the following commands can be executed:
    Server VMa instance          :  iperf -s
    Client VMb instance(client)  :  iperf -c <VMa_IP>
For maximum performance, the above VMs should be on the same node. The expected performance reaches out 25 Gbps. In order to boost this performance by x4, the threads could be increased as follows:
Client VMb instance : iperf -c <VMa_IP> -P 4
Note that the iperf service may not be installed so following commands need to be executed, depending on the OS of the VM:
    Ubuntu OS  :  sudo apt-get update && sudo apt-get install -y iperf

    CentOS     :  sudo yum install -y iperf