Local Template Server
Sunlight also provides the ability to host a local template server in order for a customer to locally host and manage their custom templates.
Create Template Repository
URL based Repository - Local template server
A user is also able to create their own local repository, in addition to utilising the Sunlight.io Portal, by creating a custom templates.json format to describe the templates as documented below.
"Own repository" is defined as being a web server serving a simple directory, i.e. leveraging a basic directory index function.
A simple example for installing such a server is presented below:
- It is assumed that a VM already exists (named as the local template serving VM), local to the network of the controller (meaning that the controller will have access to that VM, for simple HTTP requests)
- For this example, UBUNTU is the VM's installed distro.
Step 1
Install apache2 web server on the VM, using the following commands:
sudo apt update
sudo apt install apache2
Step 2
Verify that the apache2 webserver is installed, as well as that it is running:
apache2 -version
sudo systemctl status apache2
Step 3
In order to verify that the default webpage of apache2 is visible, please visit the following address through a web browser:
http://<VM ip>/
The apache2 Ubuntu default page should be visible.
Step 4
During installation, apache2 creates a default vhost entry, usually called 000-default.conf. The root directory of this vhost is normally set to /var/www/html/.
This root directory is where all the corresponding compressed versions of the converted template files, as well as the templates.json file (described above) should be existed. These few steps are meant as the most basic and simple installation, in order to create a webserver "serving" the required templates to the Sunlight controler.
The specifications of each template image and the corresponding compressed image file of the converted template will be generated or removed following the next actions.
Action to import/remove a template on the Local template server
Please follow the actions below, each time you wish to alter (import or remove) the specifications of a template image into the tempaltes.json file and generate or delete its corresponding compressed image file into the /var/www/html directory.
Action 1
Download the appropriate script called local_template_server.py to the root directory of the vhost /var/www/html/, in the local template serving VM.
$: cd /var/www/html/
$: wget assets.sunlight.io/scripts/local_template_server.py
Action 2
Add the specifications of a new template into the templates.json file and generate the compressed image file of the template, by executing the following command:
$: ./local_template_server.py                                           //
    --provider <the template provider name>                             //
    --image_filename <the filename of the converted temolate>           //
    --image_path <the full path of the converted template>              //
    --name <a custom template name of your preference>              //
    --disk_format <the type of the template file e.g qcow2,iso>         //
    --os_distro <the name of the os distro>                             //
    --os_version <the version id number>                                //
    --min_ram <the minimum RAM size in MB>                          //
    --cloud_init <cloud_init option e.g true or false>
    --add_template

e.g $: ./local_template_server.py           //
          --provider sunlight.io            //
          --image_filename ubuntu.qcow2     //
          --image_path ./                   //
          --name ubuntu_18.04
          --disk_format qcow2               //
           --os_distro ubuntu               //
          --os_version 18.04                //
          --min_ram 4096                    //
          --cloud_init true
          --add_template
More specifically :
- provider: provide the name of the template owner
- image_filename: provide the full name of the template file e.g ubuntu.qcow2 or centos.iso etc
- image_path: provide the full path of the converted template in the server e.g if the template image is provided under the
/var/www/htmldirectory then type ./ - name: provide a custom template name of your preference
- disk_format: provide the type of the template image e.g qcow, iso etc
- os_distro: provide the OS distribution of the template image
- os_version: provide the version of the OS distribution
- min_ram: provide the minimum RAM needed for this template image
- cloud_init: provide the option true for enabling the cloud-init logic or false for disabling this logic
Note
Make sure that two necessary files for each template image are included into the templates' repository var/www/html/. The first one is the corresponding compressed file of the template image in .tar.gz format and the second is the specification file templates.json which describes the specification of the template.
You should run the above script command every time you wish to import a new template image into the local template server.
Action 3
This action is for removing a template image for the local template server.
In order to remove the specifications of an imported template from the templates.json file and delete its corresponding compressed file, please execute the following command:
$: ./local_template_server.py                                           //
    --delete_template                                                   //
    --image_filename <the filename of the covnerted template>

e.g $: ./local_template_server.py                                       //
    --delete_template                                                   //
    --image_filename ubuntu.qcow2
More specifically :
- image_filename: provide the full name of the template file e.g ubuntu.qcow2 or centos.iso etc
You should run the above script command every time you wish to delete the specifications of an imported template image from the templates.json file and its corresponding compressed file from the local template server.
Action 4
Check the current version of the local_template_server.py script, by executing the following command:
$: ./local_template_server.py --version
The following example serves as an indication of how the required fields should be filled into the templates.json file:
    {
      "templates": [
        {
          "disk_format": "iso",
          "os_distro": "centos",
          "remote_status": "enabled",
          "filesize": "1",
          "hash": "3459a9026ce6ca04afa773ce3cfbd8f7dfc4a68e",
          "filename": "CentOS-7-x86_64-Minimal-2003.iso",
          "name": ubuntu_18.04
          "min_disksize": "0",
          "cluster_type": "vm",
          "min_ram": null,
          "container_format": "bare",
          "os_version": "7",
          "has_cloudinit": true,
          "architecture": "x86_64",
          "provider": "redhat",
          "date": "2020-09-01 18:35:52.072090",
          "vm_type": "hvm",
          "metadata": "",
          "requirements_meta": ""
        }
      ]
    }
An explanation of the specification fields is presented below:
- disk_format: the type of the template, the suffix e.g. iso or qcow2 etc
- os_distro: the OS distribution of the template
- remote_status: this option should be enabled
- filesize: the size of the template file in MB
- hash: the sha1sum checksum of the template image file
- filename: the filename of the template image file
- name: a custom name for the template provided by the user
- min_disksize: the minimum size of the disk needed for the template image in GB
- cluster_type: vm supported
- min_ram: the minimum RAM for the template image in MB
- container_format: one option available: bare
- os_version: the OS distribution version of the template
- has_cloudinit: true for linux distributions, false for windows distributions
- architecture: x86_64 supported
- provider : the provider name of the template
- date: the date of providing the template image
- vm_type: one option available: hvm
- metadata: blank
- requirements_meta: this will be supported in a future release (currently this field should remain blank)
Connect the local template server to the cluster UI
This section describes the process of adding a repository created already as described above, including the templates that have been uploaded, to a Sunlight cluster. By selecting the Administration option tab, the user can view information about the existing system Template repositories. In order to create a new template, click on the "plus" sign, as indicated in the following figure:
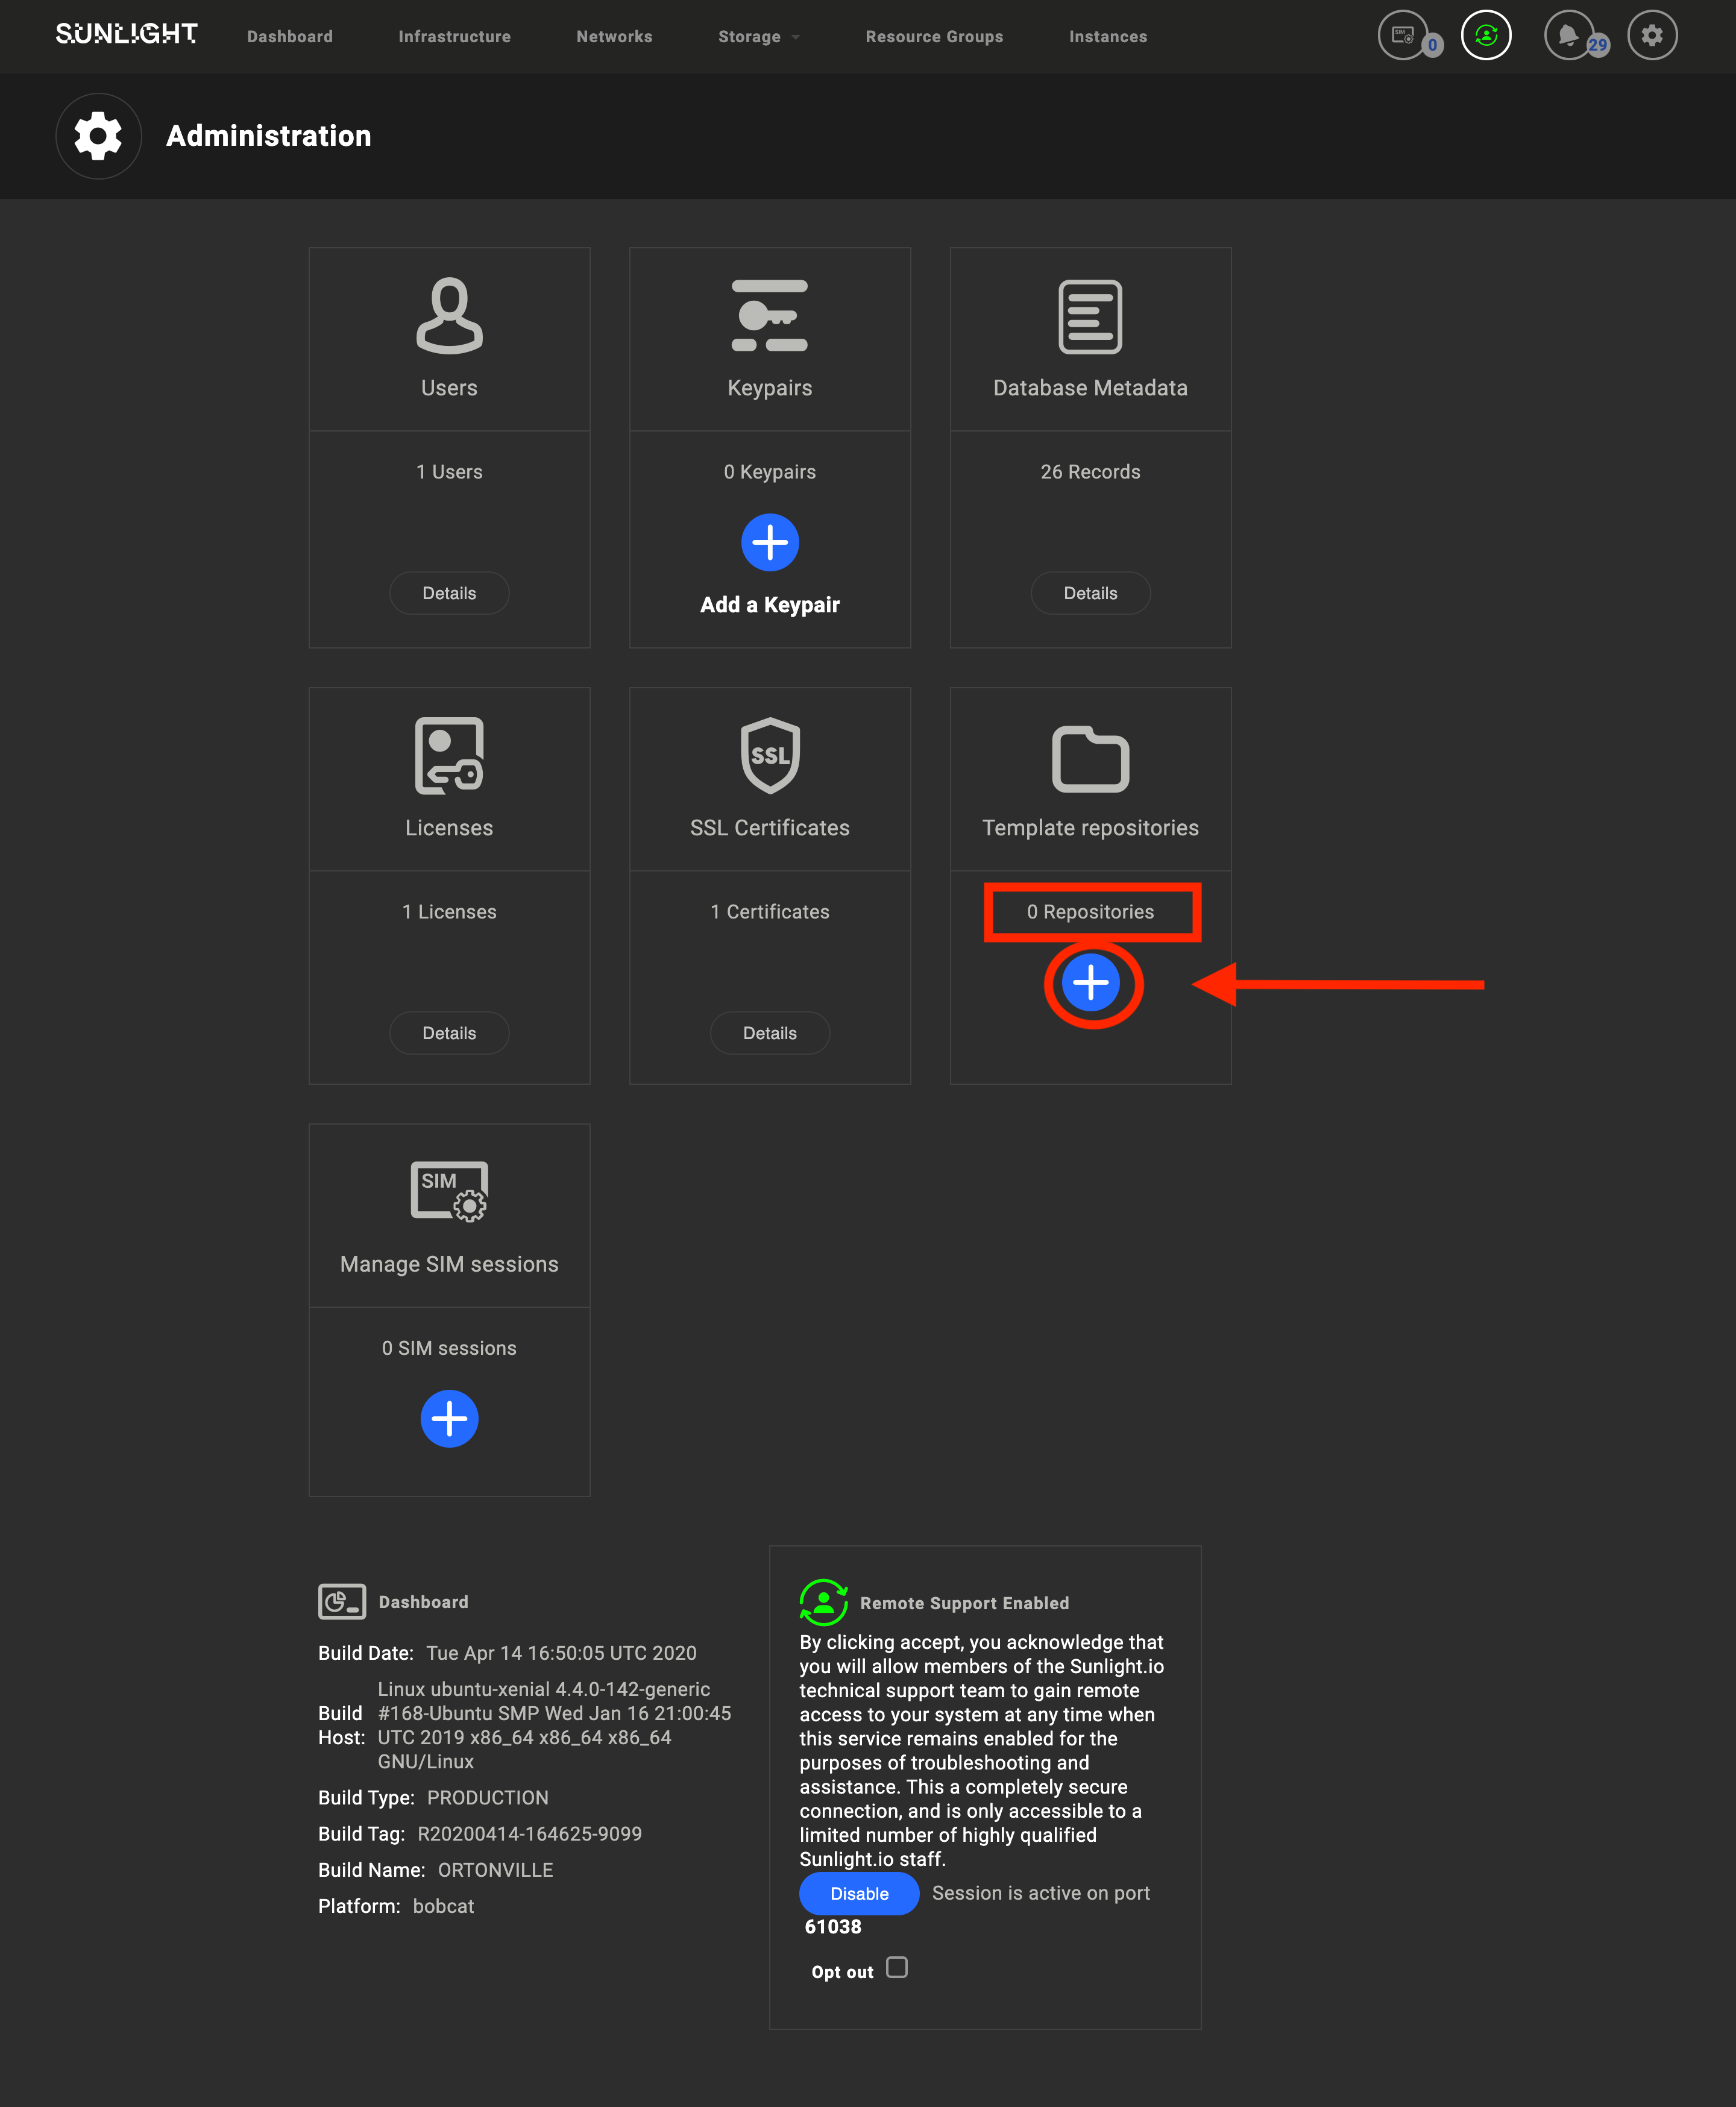
In the URL field, please fill in the address of the repository that contains the template images, that is the VM IP tested above. It is also requested to provide a unique name for this repo.
The format of the URL address that indicates the template images' repository should have the following format:
URL : http://<client_local_address>/<filename>.json

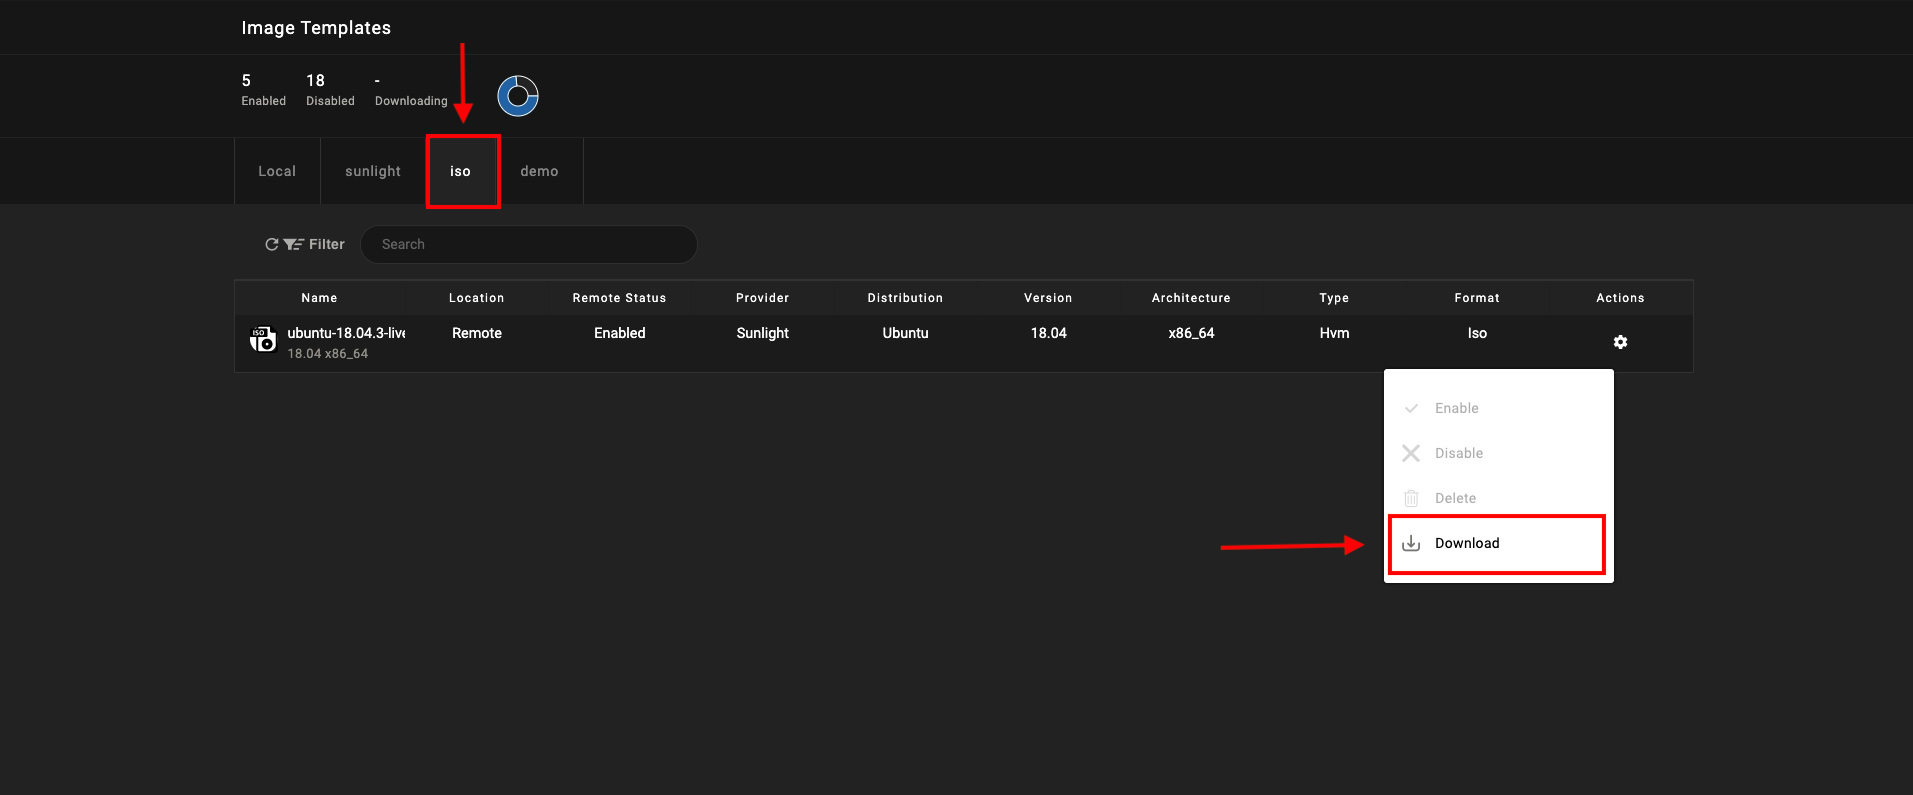
Download Template
In case the user needs to use one of the available templates from the remote repository, it is initially requested to download these templates locally by selecting the 'Actions' option, followed by the 'Download' option, as illustrated in the following image.
Warning
In cases where the Sunlight controller has no internet access, the word 'Disabled' is displayed at the remote status and no templates can be downloaded through the “Actions” option. A validation error message is also displayed on the dashboard UI, informing the user that there is no internet connectivity between the Sunlight controller and the remote template server. To view an update of the remote status, a refresh of the templates table is required.
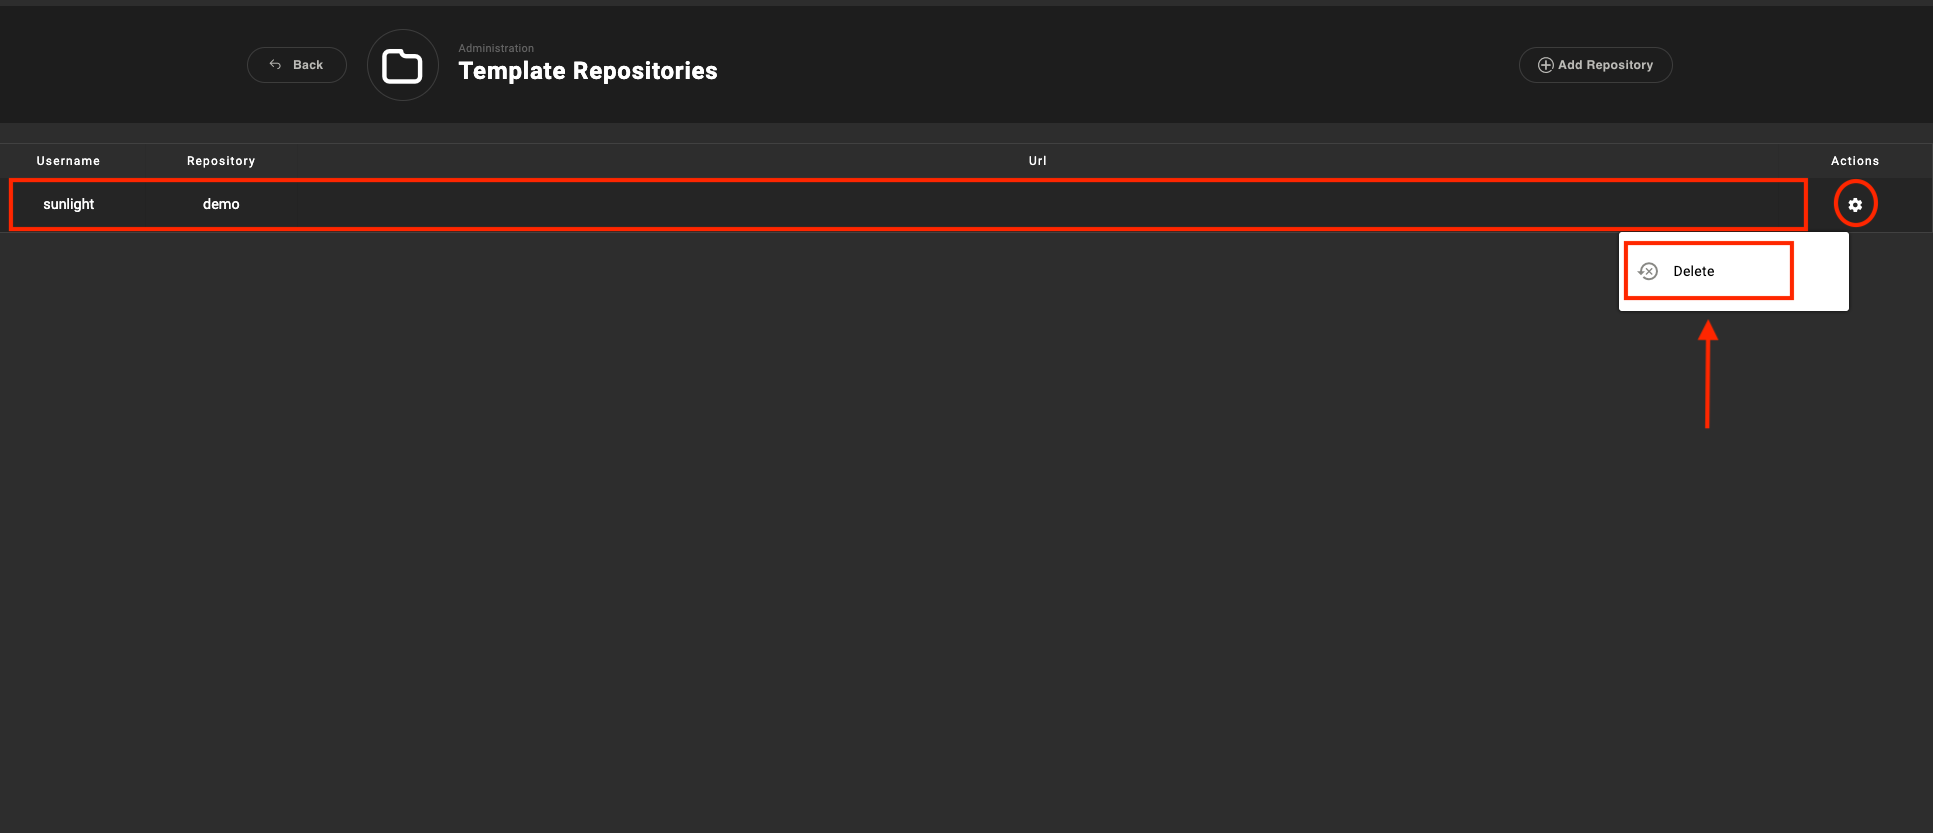
Delete Template Repository
In case the user would like to delete a custom repository from Sunlight Platform, it is requested to click on 'Administration' option tab, navigate to the 'Template Repositories' section by selecting the 'Actions' option, followed by the 'Delete' option, as illustrated in the following image.