NVIDIA GPU PASSTHROUGH SUPPORT
Modern GPUs require massive amounts of throughput to feed the data pipeline. However, legacy virtualization and cloud infrastructures cannot deliver the necessary storage IO, resulting in low GPU utilization. This is critical for supporting workloads that demand top performance with the smallest possible footprint, including AI at the edge.
Sunlight NexVisor drives millions of input-output operations per second (IOPS) per virtualized instance with ease, allowing 100% utilization of GPUs and enabling high-density, high-performance cloud at a fraction of the cost and energy consumption, offered by legacy virtualization technologies.
Nvidia GPU support for Sunlight's hypervisor designed to boost the performance of edge AI deployments and support the most demanding workloads out there, with the highest throughput and lowest latency possible.
The following sections describe the process for launching a virtualized Sunlight instance attached with a PCI device, leveraging GPU utilization.
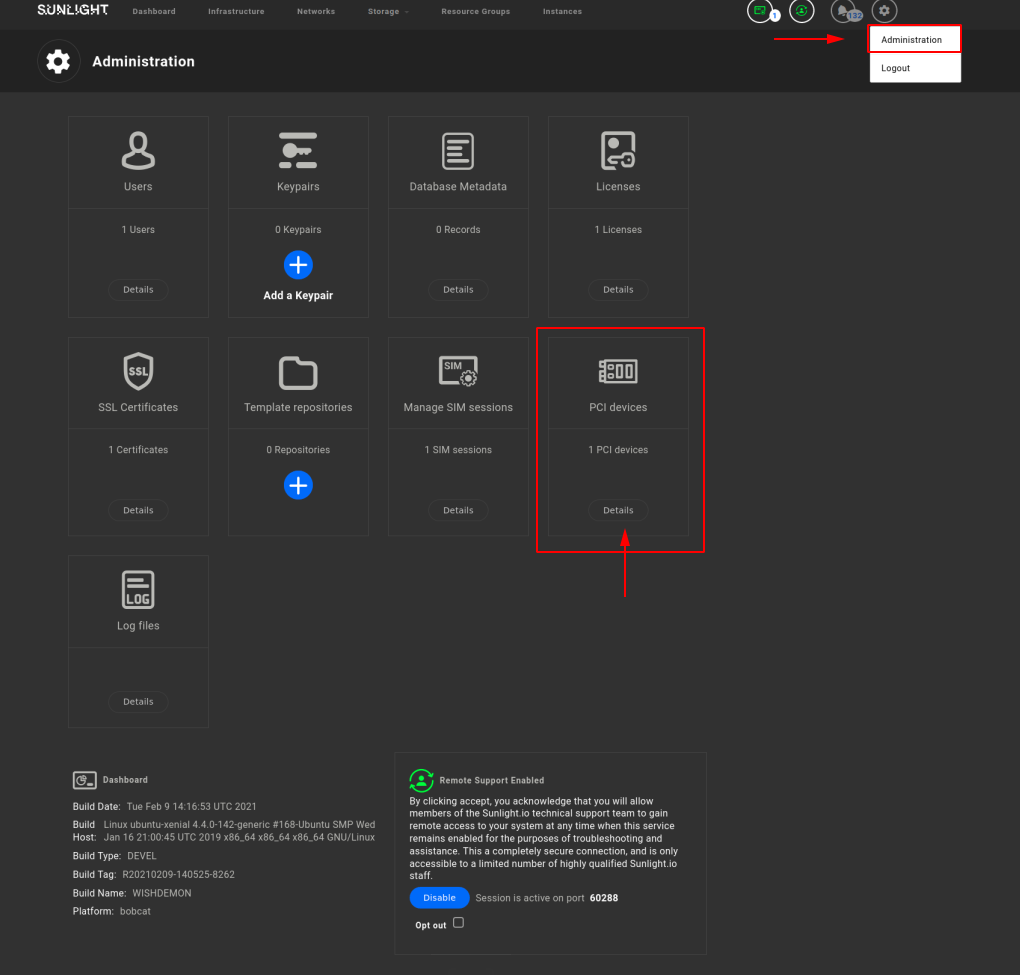
Review PCI devices
This section refers to the functionality of reviewing the PCI devices which are currently attached on the system. Select the Administration settings page and click on the "details" option of the PCI devices section, as illustrated below.
All of the PCI devices which are currently attached on the system are listed in this page.
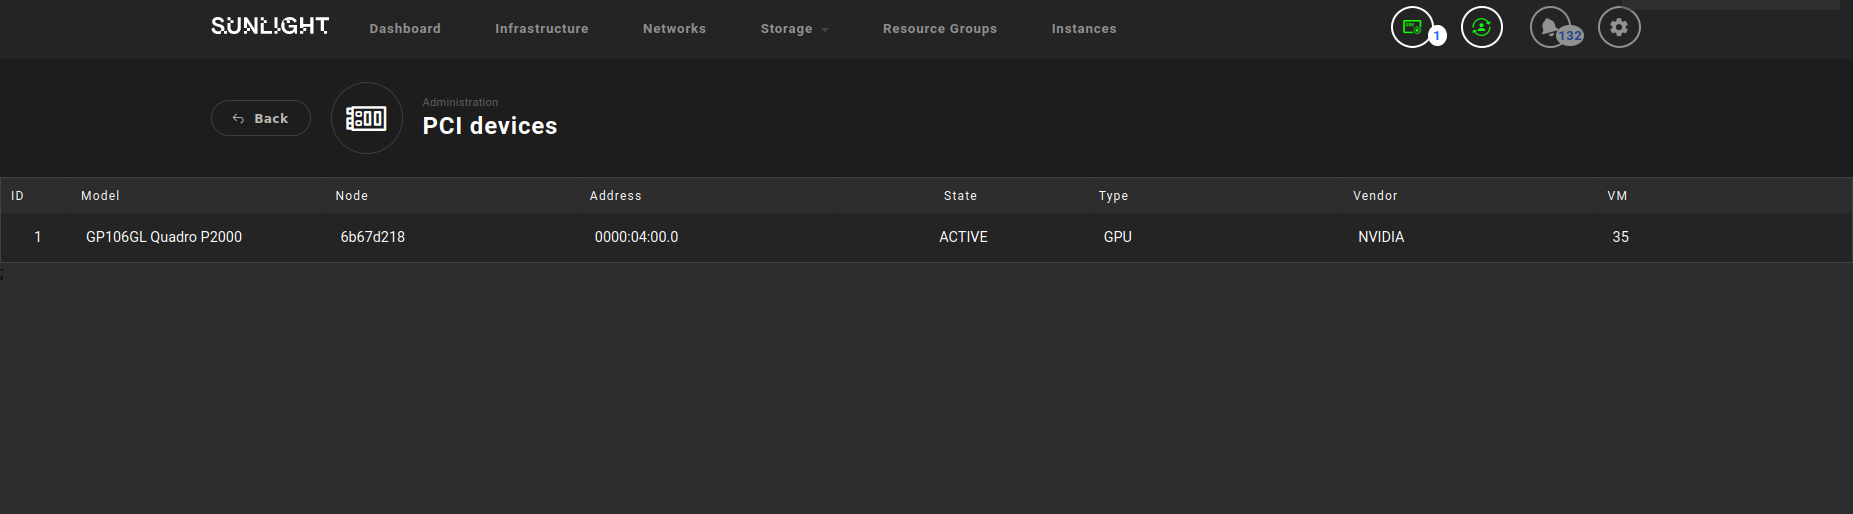
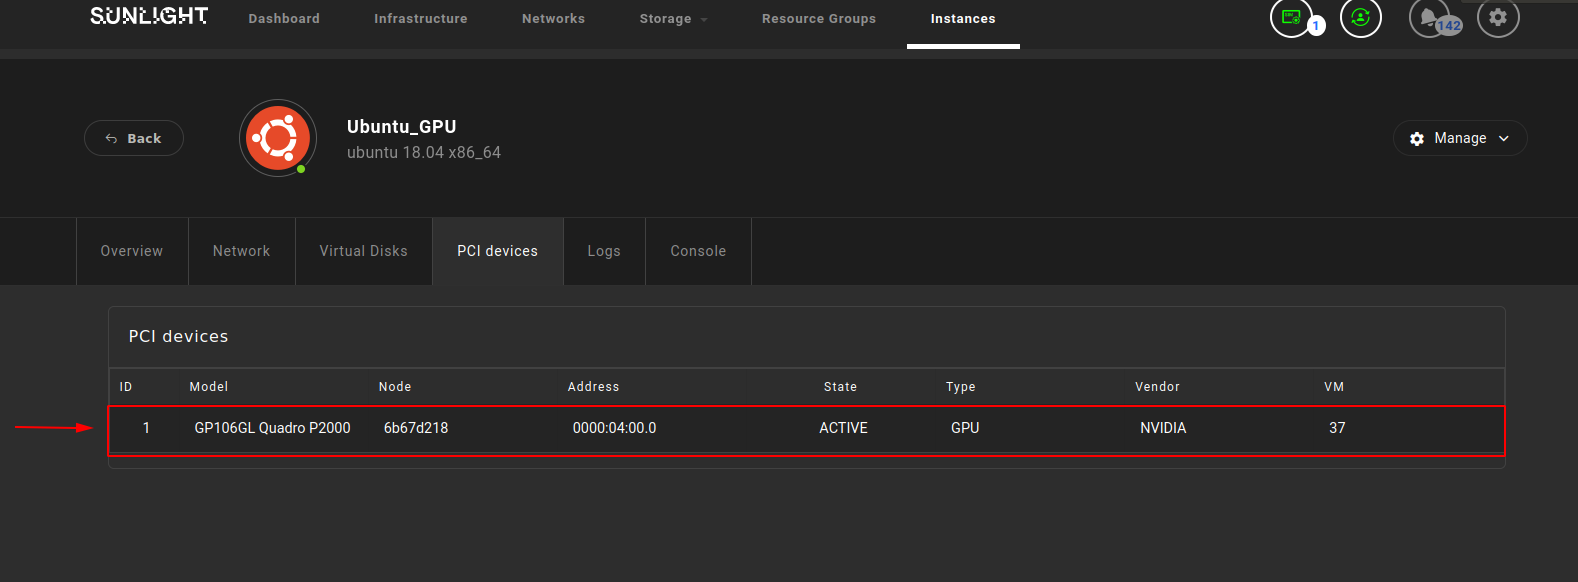
As depicted in the example above, the list contains information of the PCI device model (e.g. GP106GL Quadro P2000), the NexVisor node id which the device is currently attached to (e.g. 6b67d218), the Base Address Register (BAR) (e.g. 0000:04:00.0), the health state of the device (e.g. ACTIVE), the type of the device (e.g. GPU), the vendor (e.g. NVIDIA) and the id of the instance which utilizes this GPU device (e.g. 35).
Add a GPU device in a resource group
In order to be able to launch a Sunlight virtualized instance with GPU support, a resource group attached to the selected GPU device should be created. Follow the steps described below for adding a GPU device during the creation of a resource group.
- In step 2 "Select Datastores" : Select a datastore with physical disks from the node the GPU is attached to
- In step 3 "Select Compute Nodes" : Select the compute node with the attached GPU device
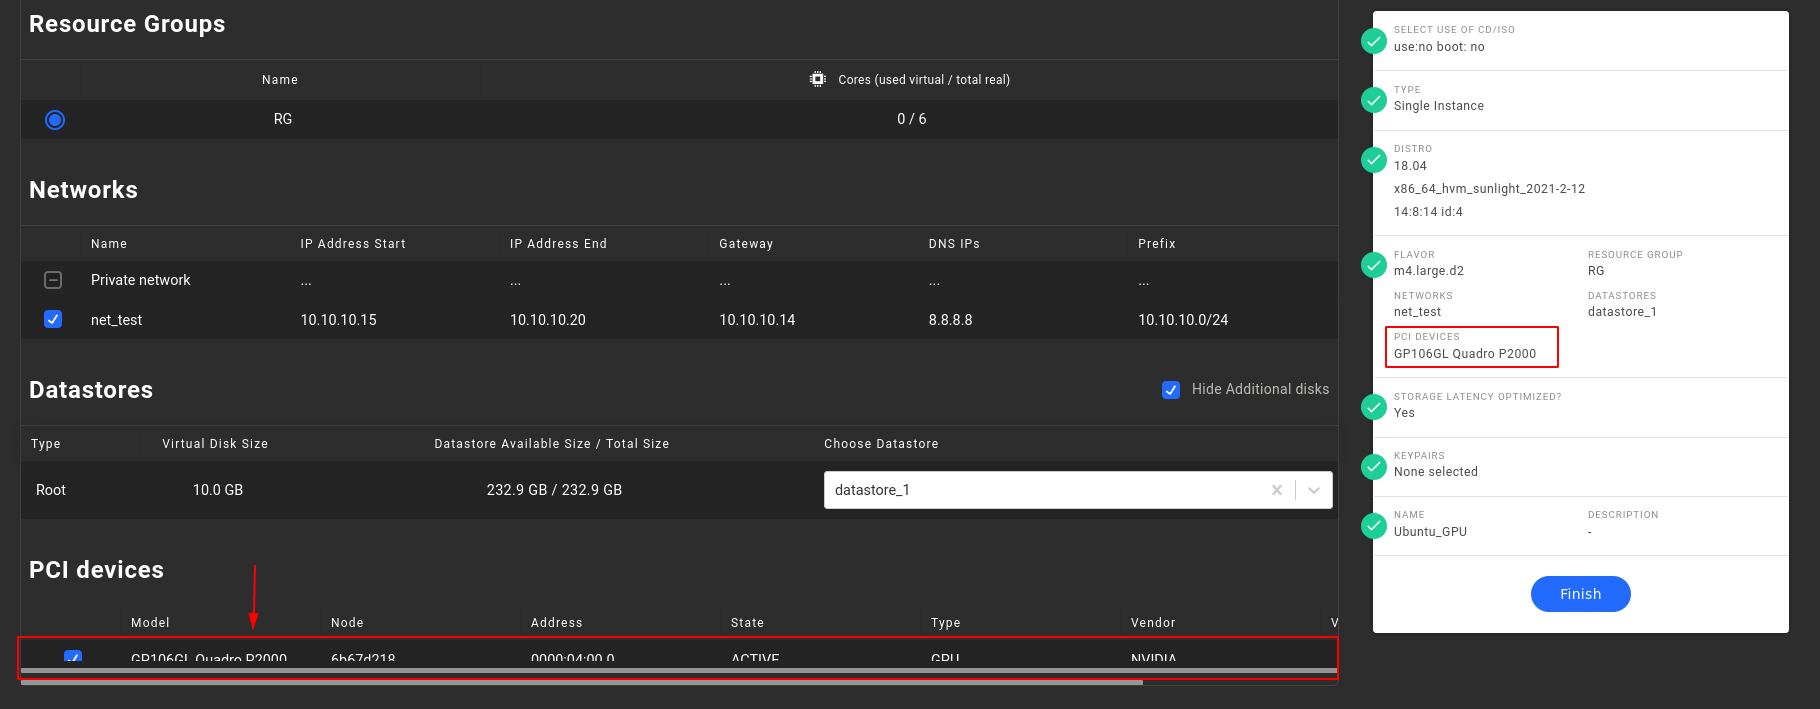
- In step 5 "Select PCI devices" : Select the desired GPU device, in order to be added in the resource group
- Click "Finish" to complete the configuration of the resource group

Once the resource group with the included GPU is configured, an instance can be created by selecting this resource group and the GPU device, as described in the next section.
Launch an Instance with GPU passthrough support
To create an instance with GPU passthrough support, click the Create Instance button and go through the steps as described in the section Instances and Clusters :
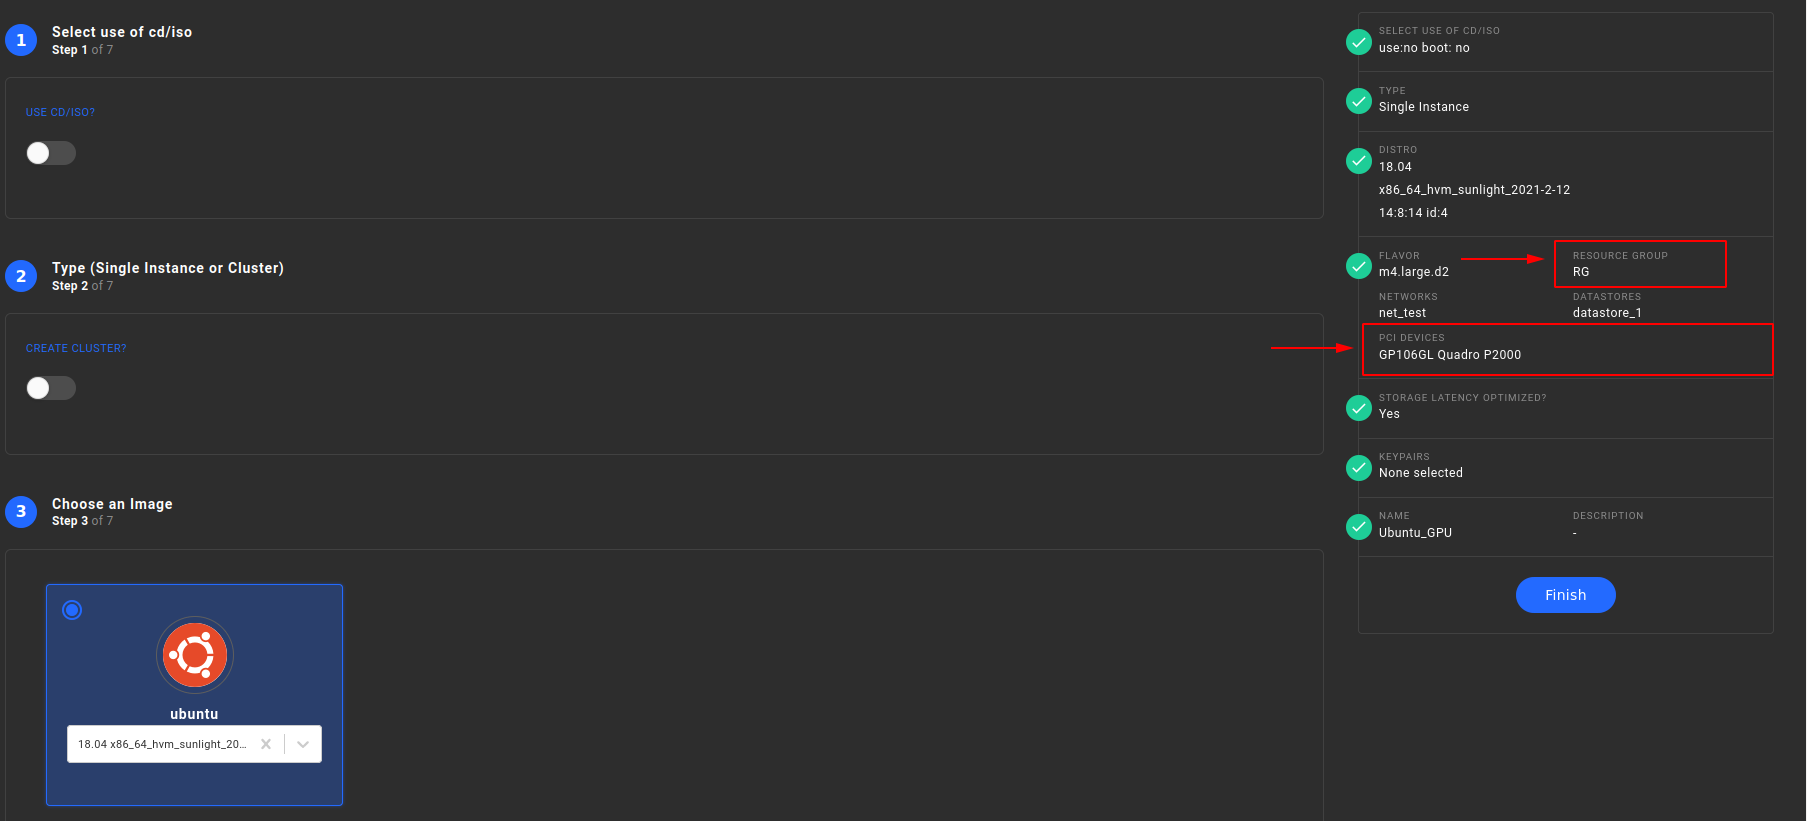
- In step 4 "Resource group" : Select the Resource group which includes the GPU device
-
In step 4 "PCI devices" : Select the model of the desired GPU device, as depicted below
The successful attachment of the GPU model on the specific Instance can be verified through the summary section at the left of the page, as displayed below:
-
Click on "Finish" to launch the Instance with GPU support
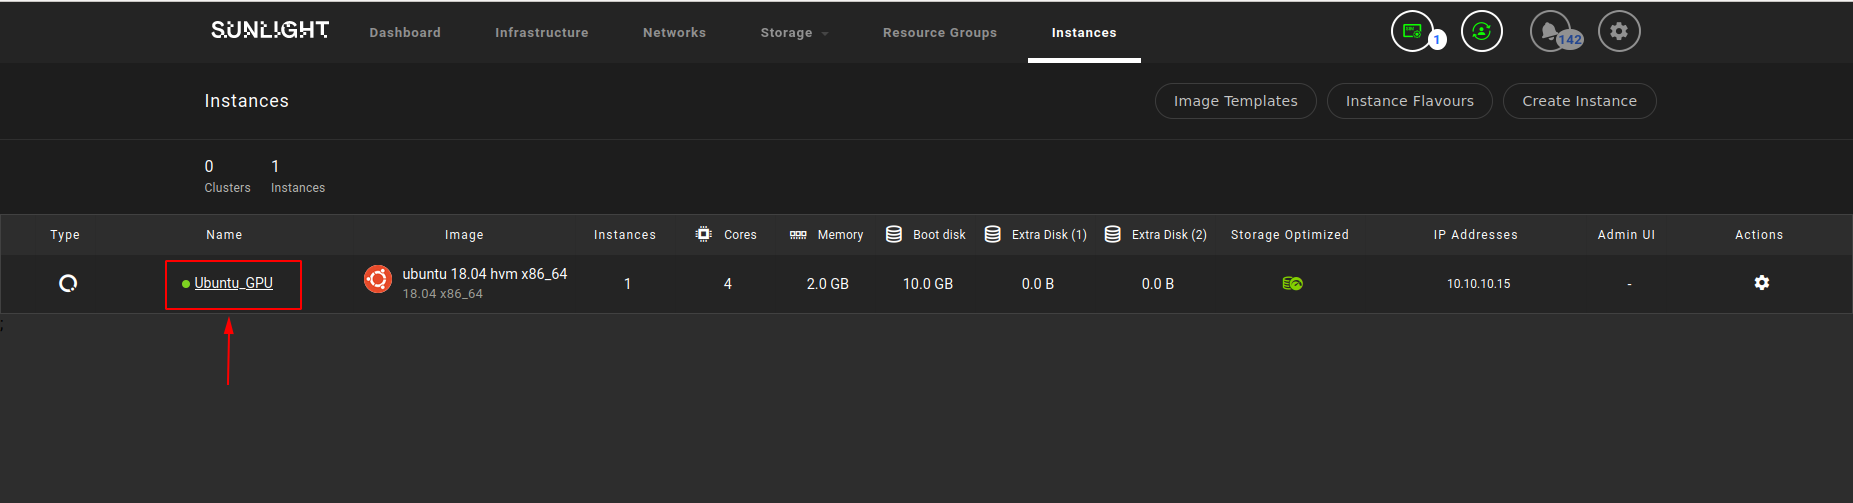
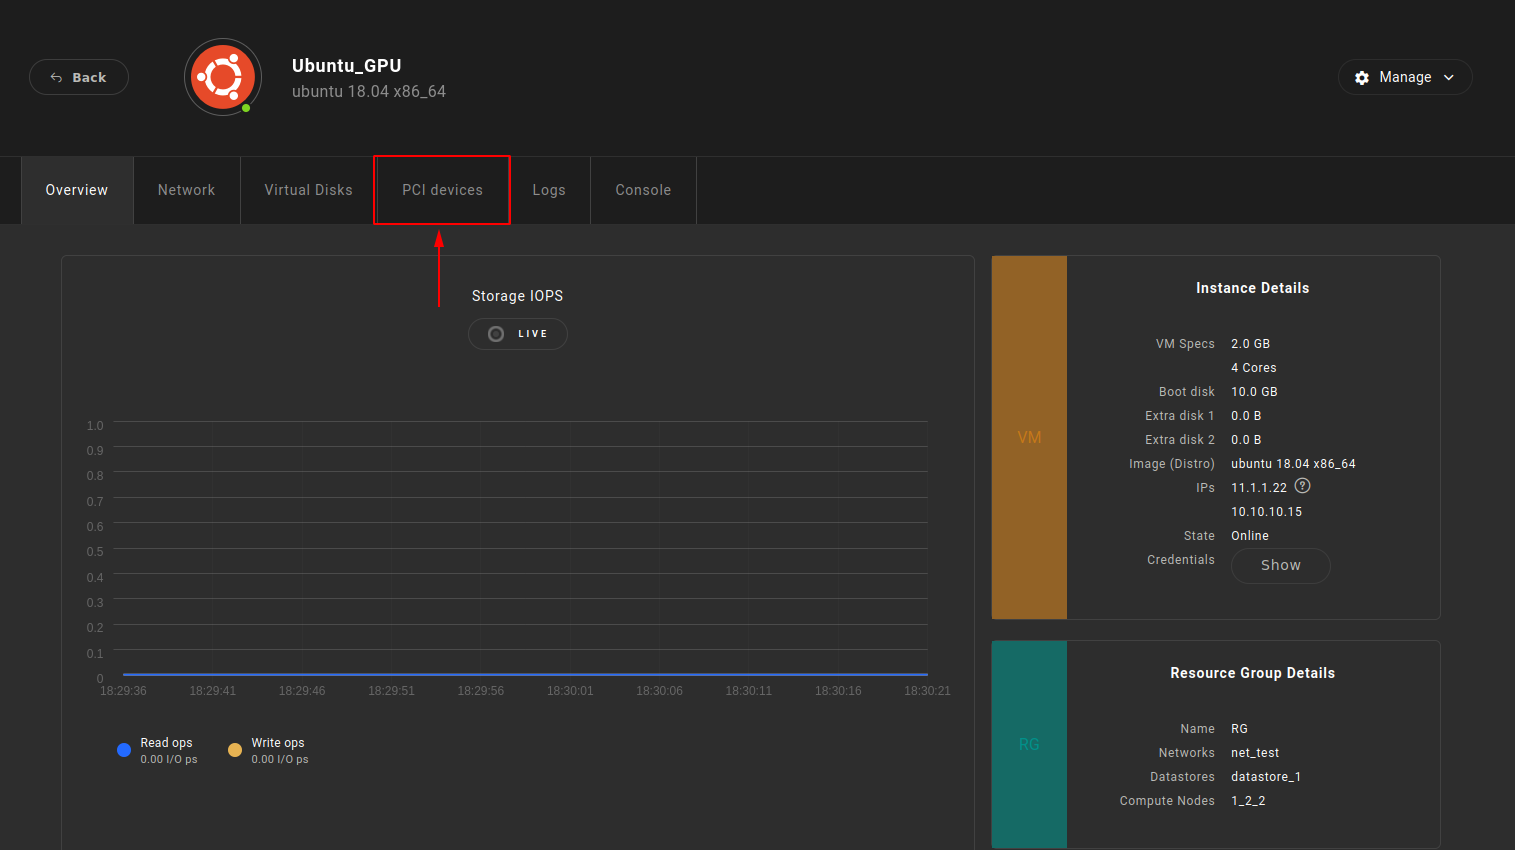
As soon as the Sunlight Instance is booted up, the user is able to review the attached GPU by selecting the specific Instance and clicking on the PCI devices tab, as illustrated in the following images:
- Clink on the instance :
- Select PCI devices
- Review the attached GPU device
Warning
Once a GPU device is attached to a specific Instance, it cannot be utilized by other Instances.
Validate the GPU passthrough
The following steps will assist you in validating that the GPU is properly attached to the guest VM :
Please follow the next steps in order to validate the GPU passthrough on the guest VM :
- Connect to the Instance either through VNC console or via ssh connection
-
Once you are connected to the Instance, execute the following cmd line to validate the device is properly attached:
lspci -vvv | grep -i nvidiaThe returned output should report the GPU device, as presented in the example below:
00:05.0 VGA compatible controller: NVIDIA Corporation GP106GL (rev a1) (prog-if 00 [VGA controller]) Subsystem: NVIDIA Corporation GP106GL [Quadro P2000] Kernel modules: nvidiafb -
Install the NVDIA driver and/or the CUDA toolkit of your preference. For further details, please visit the following attached link : CUDA Toolkit Archive
- Reboot the instance
- Disable the persistence mode (as described in the next section)
- Validate the NVIDIA driver status be executing the following command : nvidia-smi
root@instance-7:~# nvidia-smi
+-----------------------------------------------------------------------------+
| NVIDIA-SMI 418.87.00    Driver Version: 418.87.00    CUDA Version: 10.1     |
|-------------------------------+----------------------+----------------------+
| GPU  Name        Persistence-M| Bus-Id        Disp.A | Volatile Uncorr. ECC |
| Fan  Temp  Perf  Pwr:Usage/Cap|         Memory-Usage | GPU-Util  Compute M. |
|===============================+======================+======================|
|   0  Tesla K80           Off  | 00000000:00:05.0 Off |                  Off |
| N/A   30C    P0    56W / 149W |      0MiB / 12206MiB |      0%      Default |
+-------------------------------+----------------------+----------------------+
+-----------------------------------------------------------------------------+
| Processes:                                                       GPU Memory |
|  GPU       PID   Type   Process name                             Usage      |
|=============================================================================|
|  No running processes found                                                 |
+-----------------------------------------------------------------------------+
Disable NVIDIA GPU Persistence mode
Persistence Mode is the term for a user-settable driver property that keeps a target GPU initialized even when no clients are connected to it.
In our setup, this persistence mode should be disabled by the user before using the device, in order for the GPU passthrough to work properly on the VM guest.
The persistence-mode is enabled by default on the NVIDIA driver. For this reason, the user needs to disable this as soon as the NVIDIA driver is installed or the VM is booted up, by executing the following command :
    ubuntu@instance-11:~$ sudo nvidia-smi -pm 0
    Disabled persistence mode for GPU 00000000:00:05.0.
    All done.
Howerver, this mode state does not persist across an instance reboot, so the user needs to re-disable this persistence mode each time the VM guest is booted up again.
To disable this persistence mode permantly, the user should edit the following daemon unit file /etc/systemd/system/multi-user.target.wants/nvidia-persistenced.service and add the --no-persistence-mode option as depicted below
    [Unit]
    Description=NVIDIA Persistence Daemon
    After=syslog.target

    [Service]
    Type=forking
    PIDFile=/var/run/nvidia-persistenced/nvidia-persistenced.pid
    Restart=always
    ExecStart=/usr/bin/nvidia-persistenced --no-persistence-mode --verbose
    ExecStopPost=/bin/rm -rf /var/run/nvidia-persistenced/*
    TimeoutSec=300

    [Install]
    WantedBy=multi-user.target
Warning
In case the peristence mode is not disabled after an instance reset, the GPU device cannot be utilized again for this or any other instance which is going to use this device in the future. In such a scenario a full power cycle of the NexVisor node with the attached GPU device is needed, in order for this GPU device to be utilized again.