Photon Appliance Configuration
This chapter describes the Sunlight Photon Dashboard. This dashboard provides the configuration details for the settings of the Photon system, in order to communicate with the Sunlight clusters.
Photon Initial Configuration
Each Photon appliance is delivered to the client pre-configured with the default settings. These settings can be easily updated for each Sunlight Storage Accelerated Unit (SSAU), by using a graphical dashboard interface called Sunlight Photon Manager (SPM) of the chassis, as described below.
Each SSAU of a pre-configured Photon chassis contains the following default settings :
| Settings | SSAU1 | SSAU2 |
|---|---|---|
| Management Interface IP address | 192.168.1.101 | 192.168.1.102 |
| Hostname | photon1 | photon2 |
| Encryption Key | vqvTUJHK6Xhj7DMQ | vqvTUJHK6Xhj7DMQ |
| Chassis ID | 9 | 9 |
| Blade ID | 1 | 2 |
| Channel ID | 4000 | 4000 |
| SPM login credentials (username/password) | admin/admin | admin/admin |
SPM Dashboard Configuration
In order to configure the Photon chassis appliance and provide a complete interconnection with a Sunlight cluster, the user has first to login to the Sunlight Photon Manager (SPM) Dashboard by connecting the uplink 1Gpbs management physical interface of each Sunlight Storage Acceleration Unit (SSAU) in a back-to-back connection. Note that each pair of SSAUs of the photon appliance has been pre-configured with the static IP adresses 192.168.1.101 (photon1) and 192.168.1.102 (photon2) accordingly.
Once you have attached your PC's interface on the same network with the Photon, you can now open a browser (preferably in incognito mode) and type the following URL into the address bar:
192.168.1.101 for SSAU 1 or
192.168.1.102 for SSAU 2
The browser should render the following initial login page:

- Enter the credentials:
Username: admin
Password: admin
As shown on the following image:
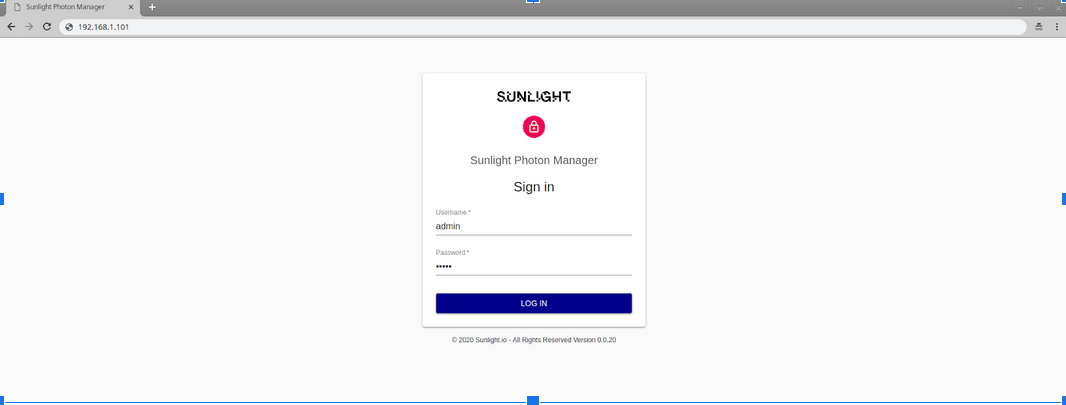
- Click on the “LOG IN” button.
Upon a successful login, the browser will redirect you to the Sunlight Photon Manager page, which provides the main configuration details of a Photon SSAU.
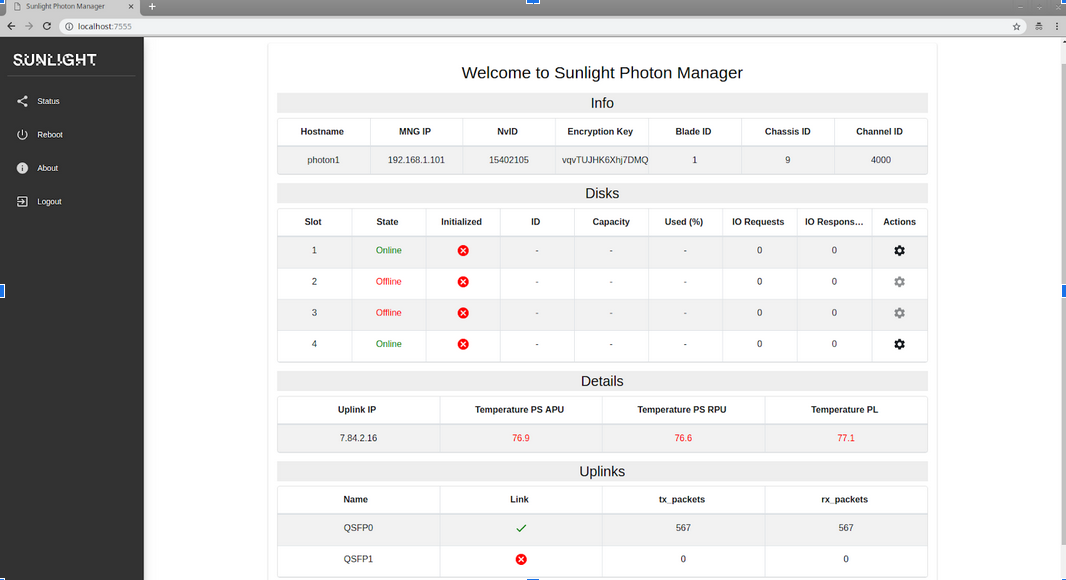
In this page the main parameters of a Photon SSAU are displayed. There are four tables: 1. Info, 2. Disks, 3. Details and 4. Uplinks, that provide useful information for the corresponding subsystems of the accelerated unit.
Configure host parameters
On the 'Info' table you can view the host parameters for each Photon SSAU, as illustrated below.

Configure the appropriate 'Encryption Key', 'Blade ID', 'Chassis ID' and 'Channel ID' settings, in order to match the corresponding configuration of the Sunlight cluster, to which you wish to connect Photon.
Note
- All fields are editable, apart from the NvID (NexVisor ID), which is hardware generated and contains a unique value.
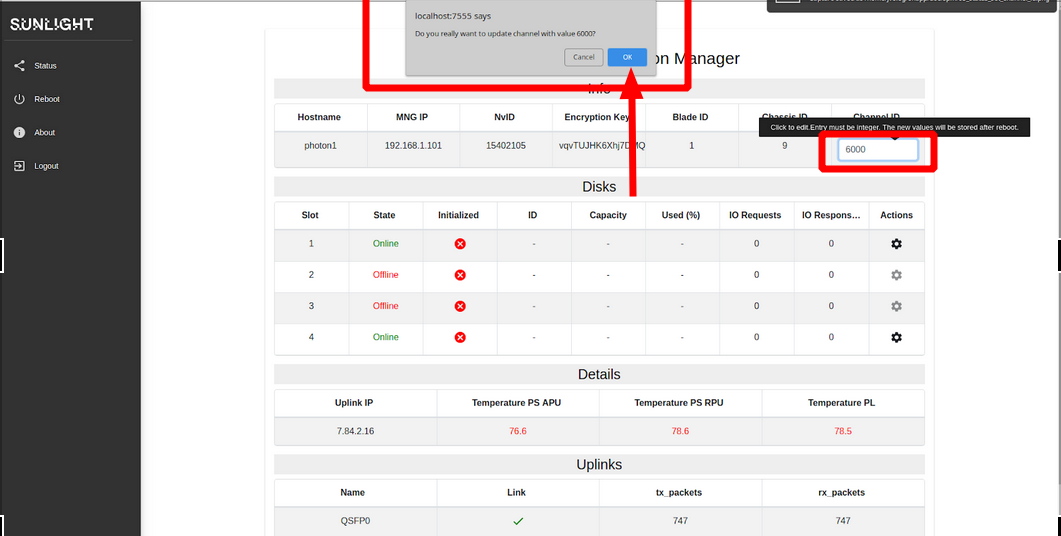
For example, in case you would like to update the 'Channel ID' :
-
Left-click on the Channel ID value (which has the default value of 4000)
-
Insert the proper required value and press 'Enter'.
A confirmation dialog box will appear, as shown the image below.
-
Click 'OK' to confirm the value that you entered.
-
Follow the same procedure for the remaining fields.
In case you would like to update the Management Interface IP address
- Edit the 'MNG IP' field, and
- Enter a new static IP address or the string name 'dhcp' in case you would like the Photon SSAU to automatically receive a new IP address from the DHCP server.
- Reboot the SSAU to apply this IP address update.
Warning
- All of the updated settings values from the Info table are stored in the QSPI EEPROM memory and in order to be applied the user should reboot the system.
Warning
- Be carefull to set a different 'Blade ID' value in each SSAU (SSAU1 and SSAU2) of the Photon chassis.
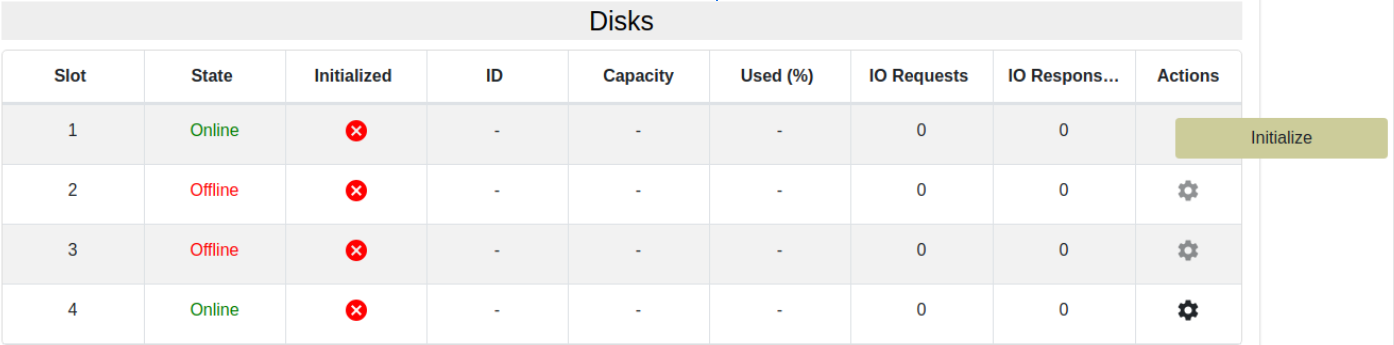
Initialize disks
In the 'Disks' table you can find all the information about the NVMe disk slots that the SSAU provides to the system.
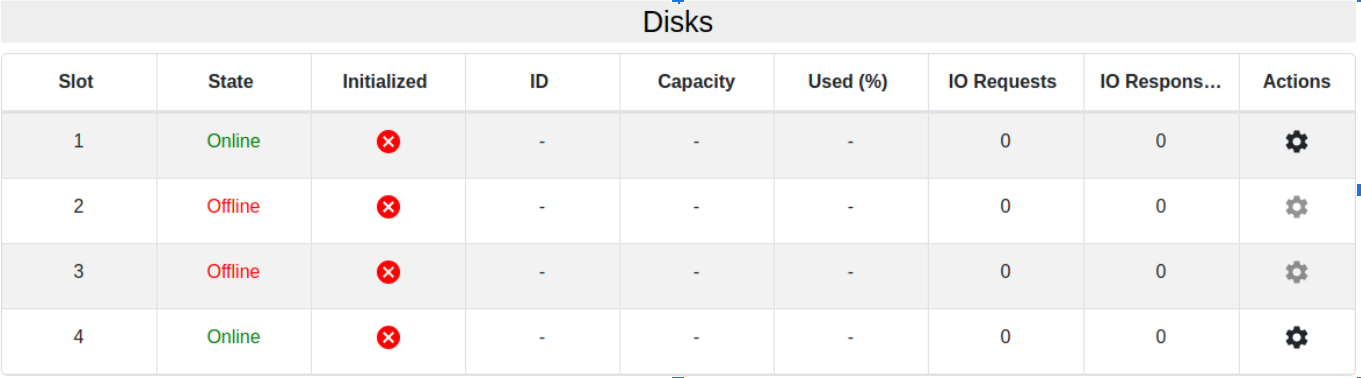
For each NVMe disk slot the following information is provided:
-
Slot: The slot number
-
State: indicates whether a NVMe disk is plugged into the drive slot. In case no disk has been inserted (or the disk is in faulty state) a red “Offline” indicator will be displayed, as illustrated in the following image (Slots 2 and 3 are displaying an 'Offline' state).
-
Initialized: indicates whether the disk is already formatted and configured with the Sunlight storage tools. A red ‘X’ symbol is indicated in case the disk is not initialized, while a green ‘V’ symbol indicates that the disk has been initialized successfully.
Note
- The Photon chassis is delivered to the customers with non-initialized disks.
-
ID: once a disk is initialized, it obtains a unique ID that is used by the Sunlight stack.
-
Capacity: the NVMe disk capacity in GBytes or MBytes.
-
Used (%): percentage of the used space.
-
IO Requests: the real-time number of received IO requests for that disk.
- IO Responses: the real-time number of IO responses performed by the disk.
- Actions: Click on the configuration option to initialize the corresponding disk.
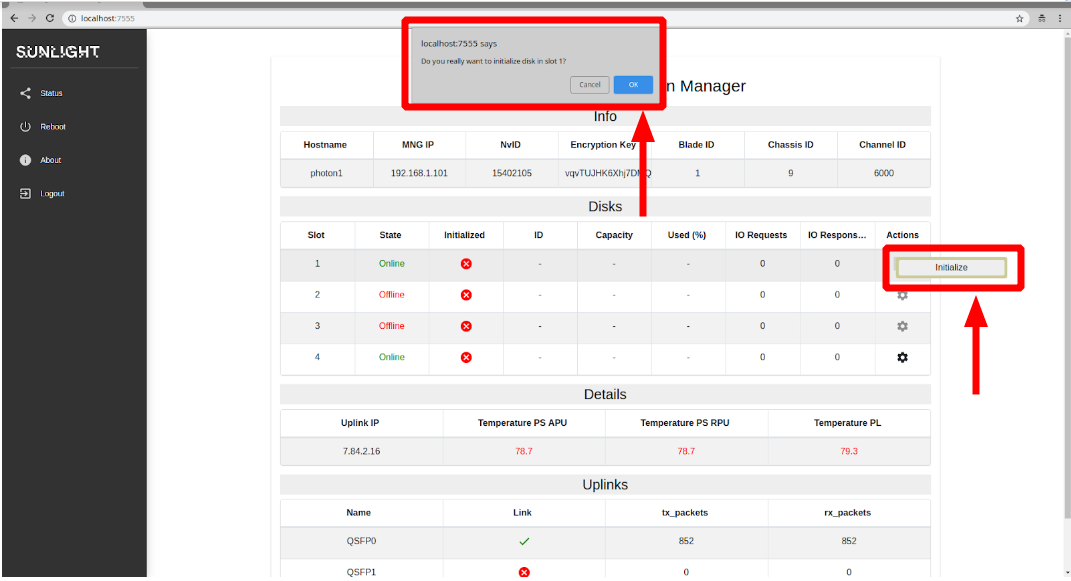
In case you would like to initialize a disk, click on the gear icon on the rightmost column of the corresponding disk slot. A drop-down menu is now displayed, as depicted in the following image.
-
Click on the “Initialize” menu item and
-
Press “OK” on the confirmation dialog box, as shown in the image below.
The SPM web-page will automatically be refreshed once the initialization process of the disk is completed, displaying the initialized disk with its associated new ID, as illustrated in the image below:
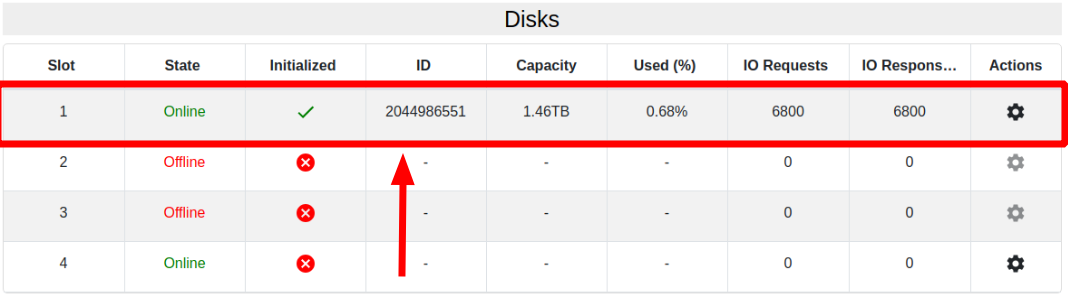
As it can now be noticed, Capacity, Used (%), IO Requests and IO Responses fields should be now enabled and the “Initialized” field should display a green “V” symbol for this specific disk slot.
Note
- All the columns of the 'Disks' table' are disabled for the corresponding disks that are 'Offline' (not connected).
Note
- We recommend that you reboot the Photon chassis after you finalize the configuration and disks initialization, in order for the chassis to be discoverable by the Sunlight master node.
Details
The 'Details' table provides the following information:

- Uplink IP: the storage IP address that is used for communication with the storage subsystem of a Sunlight cluster over the 100G Ethernet uplink.
- Temperature PS APU: temperature in Celsius of the A53 Application Processor Unit.
- Temperature PS RPU: temperature in Celsius of the Real-time Processor Unit.
- Temperature PL: temperature of the Programmable Logic (FPGA).
Warning
- In case the temperature increases more than 75 Celsius, a red warning alert will indicate that the chipset is overheated.
Uplinks
The table 'Uplinks' provides information about the optical 100G Ethernet interfaces of the Photon SSAU.
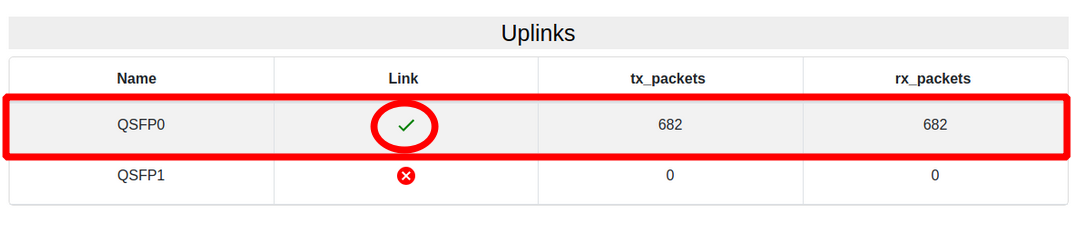
Note
- QSFP0 is the one that we are interested in, since the second QSFP1 is not currently used (2nd 100G Ethernet interface).
-
Name: Uplink name
-
Link: indicates whether an Ethernet link-up has been established. A green ‘V’ symbol indicates that link is up, whereas a red ‘X’ symbol indicates that link is down. Make sure to check the stability of the QSFP0 link, before integrating the Photon chassis with a Sunlight cluster.
-
tx_packets: real-time number for transmitted Ethernet frames (Layer 2)
- rx_packets: real-time number for received Ethernet frames (Layer 2)
Reboot
In order for any updates (on the tables described above) to take effect, the user should:
- Click on the “Reboot” menu item on the left side of the web page, as depicted in the following image:
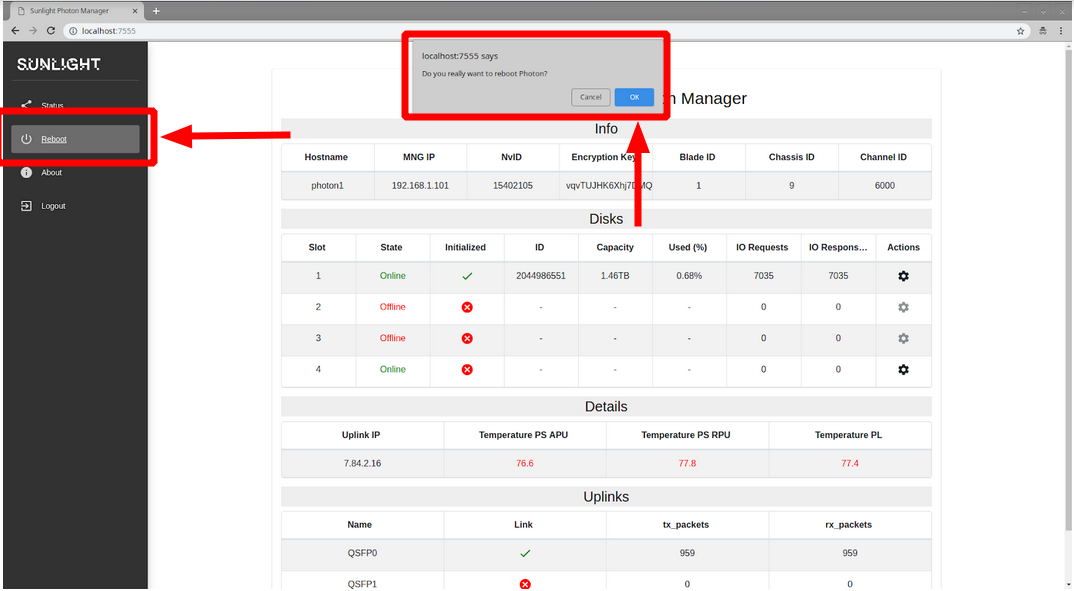
- Press “OK” on the confirmation dialog box.
Note
- We recommend that you refresh the web page, following the photon reboot.
Logout
- Click on the “Logout” menu item on the left side of the web page to logout of the SPM dashboard.