SIM on Premise Installation Guide v.4.0.20
The SIM can be deployed on a local machine to the cluster, but is not supported to run as a virtual machine on the cluster that it is managed. It should have at least the following minimum specs:
Minimum Server Requirements
Ubuntu 20.04 LTS Min Server Requirements
- 1 CPU core
- 2 Gib RAM
Warning
Running as a VM in Sunlight is not supported. This should be an external machine.
Required Ports
| Open Ports | Port Use |
|---|---|
| 80 | HTTP Access to Dashboard |
| 443 | HTTPS Access to Dashboard |
| 22 | SSH incoming fom NexVisor |
| 23456 | Update tool, can be disabled if not needed |
| 7000-10000 | |
| 12000-13000 | VNC Console Access |
| 6001 | Only required if serving recipes to NexVisor |
| 6002 | Only required if serving templates to NexVisor |
The SIM on premise can be deployed either by running a setup script or by following the steps explained below.
Install Option 1 (Recommended) using setup script
Download the install script into the /root/ folder on the cluster
      cd /root/
      wget https://assets.sunlight.io/sais/sais-2022_05_12-v4.0.20.tar.gz
      tar xvf sais-2022_05_12-v4.0.20.tar.gz
      chmod +x setup.sh
      ./setup.sh
      Welcome to SIM installation script.
      Do you want this VM to serve recipes and templates? (y|n) _y if you want to run a customized recipe and template server from the sim_
      Do you want to install Sunlight Automated Upgrade Service (SAUS)? (y|n) _y to enable the saus upgrade tool to allow updating your SIM and clusters_
      You can now visit your SIM's URL or IP and login according to the documentation.
      ....
      Select a network interface to use: _Select the primary network from the list presented_
Install Option 2 direct installation
Software requirements
- apache2 web server
- mysql database server
- python3 and tools
- unzip utility
- certbot free ssl tool
- ufw iptables management tool
(ufw is included but deactivated by default - Instructions are included to be followed in the case of having ufw enabled)
The following commands will install and configure the required components
apt update
apt install apache2
apt install certbot python3-certbot-apache
apt install mysql-server
apt install unzip
#In the following command and configuration it is highly recommended to update
`SOME_SECURE_PASSWORD` and `SOME_SECURE_PASSWORD_INTERNAL` with your preffered secure passwords.

mysql_secure_installation

#Setup MySQL root account using password
ALTER USER 'root'@'localhost' IDENTIFIED WITH caching_sha2_password BY 'SOME_SECURE_PASSWORD_INTERNAL';

#create the file /root/.my.cnf with contents
[client]
user=root
password='SOME_SECURE_PASSWORD_INTERNAL'

#Create DB
# login into mysql
CREATE DATABASE sim2;

#Create sim user
# login into mysql
CREATE USER 'sim'@'localhost' IDENTIFIED BY  'SOME_SECURE_PASSWORD';
GRANT ALL PRIVILEGES ON sim2.* TO 'sim'@'localhost';
GRANT RELOAD ON *.* TO 'sim'@'localhost';

#Put password and mysql username to the configuration file of the SIM.
/etc/sim-api.conf

mysql_user = “sim”
mysql_password= “SOME_SECURE_PASSWORD”

# mysql -u root sim2 should now work

# create a vhost file according to the specs
touch /etc/apache2/sites-available/sim2.conf
vi /etc/apache2/sites-available/sim2.conf

# add contents at sim2.conf
---------------------------------------------------------------------------
<Directory /var/www/html/sim2>
    Require all granted
</Directory>

<VirtualHost *:80>
        #%SERVER_NAME%
        DocumentRoot "/var/www/html/sim2"
        <Directory /var/www/html/sim2/>
                Options -Indexes +FollowSymLinks
                AllowOverride All
                Require all granted
        </Directory>

        Header set Access-Control-Allow-Origin "*"

        ProxyPreserveHost On
        ProxyPass "/api" "http://localhost:8999/api"
        ProxyPassReverse "/api" "http://localhost:8999/api"
        ProxyPass "/ws" "ws://localhost:8999/ws"
        ProxyPassReverse "/ws" "ws://localhost:8999/ws"
        ProxyPass "/sausc" "http://localhost:23456/sausc"
        ProxyPassReverse "/sausc" "http://localhost:23456/sausc"
        ProxyPass "/sausc_ws" "ws://localhost:23456/sausc_ws"
        ProxyPassReverse "/sausc_ws" "ws://localhost:23456/sausc_ws"


        ErrorLog ${APACHE_LOG_DIR}/error.log
        CustomLog ${APACHE_LOG_DIR}/access.log combined

</VirtualHost>
---------------------------------------------------------------------------
# create a template vhost file according to the specs
touch /etc/apache2/sites-available/cluster-tmpl.conf
vi /etc/apache2/sites-available/cluster-tmpl.conf

# add contents at cluster-tmpl.conf
---------------------------------------------------------------------------
Listen %OUT_PORT%

<VirtualHost *:%OUT_PORT%>

        ProxyPreserveHost On
        ProxyRequests Off

        Header set Access-Control-Allow-Origin "*"

        ProxyPass "/" "http://localhost:%CLUSTER_PORT%/"
        ProxyPassReverse "/" "http://localhost:%CLUSTER_PORT%/"

        RewriteEngine on
        RewriteCond %{HTTP:UPGRADE} WebSocket [NC]
        RewriteCond %{HTTP:CONNECTION} Upgrade [NC]
        RewriteRule .* ws://localhost:%CLUSTER_PORT%%{REQUEST_URI} [P]

        #%VHOST%

</VirtualHost>
---------------------------------------------------------------------------

a2ensite sim2.conf
a2dissite 000-default.conf

a2enmod proxy
a2enmod proxy_http
a2enmod rewrite
a2enmod deflate
a2enmod headers
a2enmod proxy_html
a2enmod proxy_balancer
a2enmod proxy_connect
a2enmod proxy_wstunnel
a2enmod ssl

#restart apache2
apache2ctl configtest
systemctl restart apache2

# test certobot and do a dry run
apt install certbot
certbot --apache
systemctl status certbot.timer
certbot renew --dry-run
# end of test
Most providers offer a firewall for their instances, so it has to be configured appropriately to allow traffic for http, https traffic and ports 22, and 7000-10000 (used for on premise cluster access).
For Ubuntu distros automatic updates are by default enabled. We have to disallow automatic updates in order to avoid any issue with our platform. In order to achieve this we have to change the contents of the file /etc/apt/apt.conf.d/20auto-upgrades to:
APT::Periodic::Update-Package-Lists "0";
APT::Periodic::Unattended-Upgrade "0";
Deploy the application
We should ensure that the default user of the system is the ubuntu. For AWS instances this is already preconfigured, but from other providers we might have to create the user. We can create the ubuntu user with:
adduser ubuntu
Then add user to sudoers with:
usermod -aG sudo
and append visudo with:
ubuntu ALL=(ALL) NOPASSWD:ALL
We can then update the /home/ubuntu/.ssh/authorized_keys file with the keys we have to allow ssh access.
Finally add to the configuration file /etc/sim-api.conf the following line:
sim_host_provider = “on-premise”
By default ubuntu firewall ufw is disabled. However, if we have to enable it we must add specific ruleset for our application to work:
ufw app list
ufw allow in "apache"
ufw allow "apache secure"
ufw allow ssh
ufw allow 7000:10000/tcp
ufw allow 7000:10000/udp
ufw allow 12000:13000/tcp
ufw allow 12000:13000/udp

ufw enable
ufw status
ufw reload
Deploying the application requires the API binary and the UI build as well as properly setting up the required software.
For the following settings we assume that the sim_api is located under /home/ubuntu/sim_api.
Add the file vi /etc/init.d/sim with content:
# vi /etc/init.d/sim

#!/bin/sh
### BEGIN INIT INFO
# Provides:             sim
# Required-Start:       $remote_fs $syslog
# Required-Stop:        $remote_fs $syslog
# Default-Start:        2 3 4 5
# Default-Stop:
# Short-Description:    start sim api
### END INIT INFO


SCRIPT=sim_api
BASE_PATH=/home/ubuntu
RUNAS=root

PIDFILE=/run/sim.pid
LOGFILE=/var/log/sim.log

start() {
  if [ -f "$PIDFILE" ] && kill -0 $(cat "$PIDFILE"); then
    echo 'Service already running' >&2
    return 1
  fi
  cd $BASE_PATH
  echo 'Starting service…' >&2
  local CMD="$BASE_PATH/$SCRIPT &>> \"$LOGFILE\" & echo \$!"
  echo $CMD
  su -c "$CMD" $RUNAS > "$PIDFILE"
  echo 'Service started' >&2
}

stop() {
  if [ ! -f "$PIDFILE" ] || ! kill -0 $(cat "$PIDFILE"); then
    echo 'Service not running' >&2
    return 1
  fi
  echo 'Stopping service…' >&2
  kill -15 $(cat "$PIDFILE") && rm -f "$PIDFILE"
  echo 'Service stopped' >&2
}

restart() {
  stop
  start
}

status() {
  if [ -f "$PIDFILE" ] && kill -0 $(cat "$PIDFILE"); then
    echo 'Service is running' >&2
    return 1
  fi
  echo 'Service not running' >&2
}

case "$1" in
  start)
    start
    ;;
  stop)
    stop
    ;;
  restart)
    restart
    ;;
  status)
    status
    ;;
  *)
    echo "Usage: $0 {start|stop|restart|status}"
esac
And make it executable by running:
chmod +x /etc/init.d/sim
Then add the file /etc/systemd/system/sim.service with content:
#vi /etc/systemd/system/sim.service

[Unit]
Description=The SIM service
After=multi-user.target
Documentation=https://sunlight.io/docs/

[Service]
Type=forking
User=root
ExecStart=/etc/init.d/sim start
ExecStop=/etc/init.d/sim stop
ExecReload=/etc/init.d/sim restart
PIDFile=/run/sim.pid
Restart=on-failure

[Install]
WantedBy=multi-user.target
SIM service can now be managed through:
sudo service sim start
sudo service sim stop
sudo service sim restart
Enable SIM startup after a restart with:
sudo systemctl enable sim
As we write logs to /var/log/sim.log file we have to apply logrotation in order to avoid using too much available disk space. In order to achieve this we have to add the file /etc/logrotate.d/sim_api with contents:
/var/log/sim.log {
    daily
    rotate 10
    size 200M
    missingok
    copytruncate
    compress
    notifempty
    su root root
}
This rule keeps up to 10 rotations when sim.log exceeds 200MB.
The scripts folder that contains various scripts necessary for the application should also be uploaded and all scripts should be executable. The following keys should also be upload at:
~/sshKeys/id_rsa_sim
~/sshKeys/id_rsa_sim.pub.pem
~/sshKeys/manager_vm.pem
~/sshKeys/manager_vm.pub
And must have permissions “-rw-------” (600)
The configuration file should be present at:
/etc/sim-api.conf
UI build files should be placed within the folder:
/var/www/html/sim2
SAUS setup
SAUS (Sunlight Automated Upgrade Service) is responsible for automated updates of the SIM installation. A valid SAUS client installation is required in order to exploit its features. Specific ports have to enabled on the host VM:
ufw allow 23456/tcp
ufw allow 23456/udp

ufw enable
ufw status
ufw reload
SAUS requires its own DB and user:
CREATE DATABASE db_saus_client;
CREATE USER 'saus'@'localhost' IDENTIFIED BY 'SAUS_PASSWORD';
GRANT ALL PRIVILEGES ON db_saus_client.* TO 'saus'@'localhost';
GRANT RELOAD ON *.* TO 'saus'@'localhost';
FLUSH PRIVILEGES;
The saus configuration has to be at /home/ubuntu/saus/configuration/saus.conf
The SAUS_PASSWORD should be replace by the password given at the step before at SAUS_PASSWORD
# The type of the DB
db_type = "mysql"

# The name of the DB
db_name = "db_saus_client"

# The user of the db
db_user = "saus"

# The password of the dbuser
db_password = "%SAUS_PASSWORD%"

# The ip of the db
db_host = "localhost"

# The port of the db
db_port = "3306"

# The configuration path of mysql
mysql_conf_path = "/etc/mysql/mysql.conf.d/mysql.cnf"

# Local download path
download_path = "/downloads/"

# Local backup path
backup_path = "/backup/"

# Local path to untar svum tarballs
upgrade_path = "/upgrade_files/"

# The username of the saus server user
saus_server_username = "sunlight"

# The password of the saus server user
saus_server_password = "sunlight"

# Wheather the server uses a self signed certificate
saus_server_self_signed_cert = false

# The url of the saus server
saus_server_url = "https://saus-one.sunlight.io/"

# The login route for the saus server
saus_server_login_route = "user/login"

# The period (in minutes) that the saus client checks for updates
check_for_update_freq = 60

# The local folder of the saus client where the tarballs of the updates are downloaded
update_files_folder = "/home/ubuntu/"

# Check for updates
update_period = 3600

# The certificate of SAUS server
certificate = "/etc/cert/public.crt"

# The private key of SAUS server
private_key = "/etc/cert/private.key"

# The string to connect to platform db
platform_db_connection_string = 'root:@/sim2?charset=utf8&parseTime=True&loc=Local'

# The name of the platform db
platform_db_name = "sim2"

# The sql query that retrieves the vdisks
sqlquery_get_vdisks = 'select * from vdisks where vdisks.real_name like "%OPENSTACK%";'

# The sql query that retrieves the slaves of all nodes
sqlquery_get_slave_nodes = 'select ip, GROUP_CONCAT(storages.id) as members, GROUP_CONCAT(device) as devices, nodes.type as node_type, nodes.mvgroup_id from storages left join nodes on nodes.storage_ip = storages.ip group by storages.ip;'

# The user of the platform api
platform_user = "sunlight"

# The password of the platform api
platform_password = "sunlight"

# The url of the platform api
platform_url = "http://localhost:8999/"

# The login route for the platform
platform_login_route = "api/login"

# The default timeout for ssh connection
default_timeout = 5

# The default storage port for ssh connection
default_storage_port = 22

# The default mount path for copy action
mount_path_for_copy_action = "/mnt"

# Build info file
build_info = "/root/build_info.sunlightOS"

# The begining of the line describing the build version
build_version_description = "#buildversion:"

# The platform of messages
messages_platform = ["saus-demo-1"]

# The default version of the platform
default_platform_version = "2.4.4"

# The default port of the saus client
default_port = "23456"

# The period for checking messages in the server in minutes
check_messages_interval = 5

# The url for maintenance endpoint
maintenance_url = "api/maintenance"

# The path of version.txt
version_file_path = "/home/ubuntu/version.txt"
SAUS client binary should be placed under path /home/ubuntu/saus/saus-client
The /downloads folder should be present and owned by the ubuntu user
chown ubuntu:ubuntu /downloads
The version of the SIM (e.g. 4.0.20) should be stored at the /home/ubuntu/version.txt
The saus service should be present at /etc/init.d/saus file and be executable with content:
#!/bin/sh
### BEGIN INIT INFO
# Provides:             saus
# Required-Start:       $remote_fs $syslog
# Required-Stop:        $remote_fs $syslog
# Default-Start:        2 3 4 5
# Default-Stop:
# Short-Description:    start saus api
### END INIT INFO

SCRIPT=saus-client
BASE_PATH=/home/ubuntu/saus/
RUNAS=root

PIDFILE=/run/saus.pid
LOGFILE=/var/log/saus.log

start() {
  if [ -f "$PIDFILE" ] && kill -0 $(cat "$PIDFILE"); then
    echo 'Service already running' >&2
    return 1
  fi
  cd $BASE_PATH
  echo 'Starting service…' >&2
  local CMD="$BASE_PATH/$SCRIPT &>> \"$LOGFILE\" & echo \$!"
  echo $CMD
  su -c "$CMD" $RUNAS > "$PIDFILE"
  echo 'Service started' >&2
}

stop() {
  if [ ! -f "$PIDFILE" ] || ! kill -0 $(cat "$PIDFILE"); then
    echo 'Service not running' >&2
    return 1
  fi
  echo 'Stopping service…' >&2
  kill -15 $(cat "$PIDFILE") && rm -f "$PIDFILE"
  echo 'Service stopped' >&2
}

restart() {
  stop
  start
}

status() {
  if [ -f "$PIDFILE" ] && kill -0 $(cat "$PIDFILE"); then
    echo 'Service is running' >&2
    return 1
  fi
  echo 'Service not running' >&2
}

case "$1" in
  start)
    start
    ;;
  stop)
    stop
    ;;
  restart)
    restart
    ;;
  status)
    status
    ;;
  *)
    echo "Usage: $0 {start|stop|restart|status}"
esac
The saus service file should be placed at /etc/systemd/system/saus.service with content:
[Unit]
Description=The SAUS service
After=multi-user.target
Documentation=https://sunlight.io/docs/

[Service]
Type=forking
User=root
ExecStart=/etc/init.d/saus start
ExecStop=/etc/init.d/saus stop
ExecReload=/etc/init.d/saus restart
PIDFile=/run/saus.pid
Restart=on-failure

[Install]
WantedBy=multi-user.target
And the logrotate file under /etc/logrotate.d/saus_logrotate with content:
/var/log/saus.log {
    daily
    rotate 10
    size 200K
    missingok
    copytruncate
    compress
    notifempty
    su root root
}
At the end we should enable and start the SAUS service by:
systemctl enable saus
systemctl start saus
SIM as Recipe & Template server
In order for SIM to serve as a recipe and template server we have to use two separate ports in our SIM web server. Default are 6001 and 6002 so they have to be enabled if firewall is on at the host VM
Specific ports have to enabled on the host VM:
ufw allow 6001/tcp
ufw allow 6001/udp
ufw allow 6002/tcp
ufw allow 6002/udp

ufw enable
ufw status
ufw reload
Two folders have to be created at /var/www/html/recipes and /var/www/html/templates. Also the configuration files required should be placed at /etc/apache2/sites-available/recipes.conf with content:
Listen 6001

<Directory /var/www/html/recipes>
    Require all granted
</Directory>

<VirtualHost *:%PORT%>
        DocumentRoot "/var/www/html/recipes"
        <Directory /var/www/html/recipes/>
                Options -Indexes +FollowSymLinks
                AllowOverride All
                Require all granted
        </Directory>

        Header set Access-Control-Allow-Origin "*"

        ErrorLog ${APACHE_LOG_DIR}/error.log
        CustomLog ${APACHE_LOG_DIR}/access.log combined
</VirtualHost>
And under /etc/apache2/sites-available/templates.conf with content
Listen 6002

<Directory /var/www/html/templates>
    Require all granted
</Directory>

<VirtualHost *:%PORT%>
        DocumentRoot "/var/www/html/templates"
        <Directory /var/www/html/templates/>
                Options -Indexes +FollowSymLinks
                AllowOverride All
                Require all granted
        </Directory>

        Header set Access-Control-Allow-Origin "*"

        ErrorLog ${APACHE_LOG_DIR}/error.log
        CustomLog ${APACHE_LOG_DIR}/access.log combined
</VirtualHost>
Finally we should enable those configuration and reload apache using
a2ensite recipes.conf
a2ensite templates.conf
sudo service apache reload
Login to your new SIM and change the default password
From your AWS console you can find the AWS assigned IP address and the instance ID of your new SIM v2 instance. We recommend assigning an elastic IP address and then generating an SSL certificate. This is also described in the optional steps below.
In your browser window, enter the IP address of the new SIM instance you have deployed and the following screen should appear:
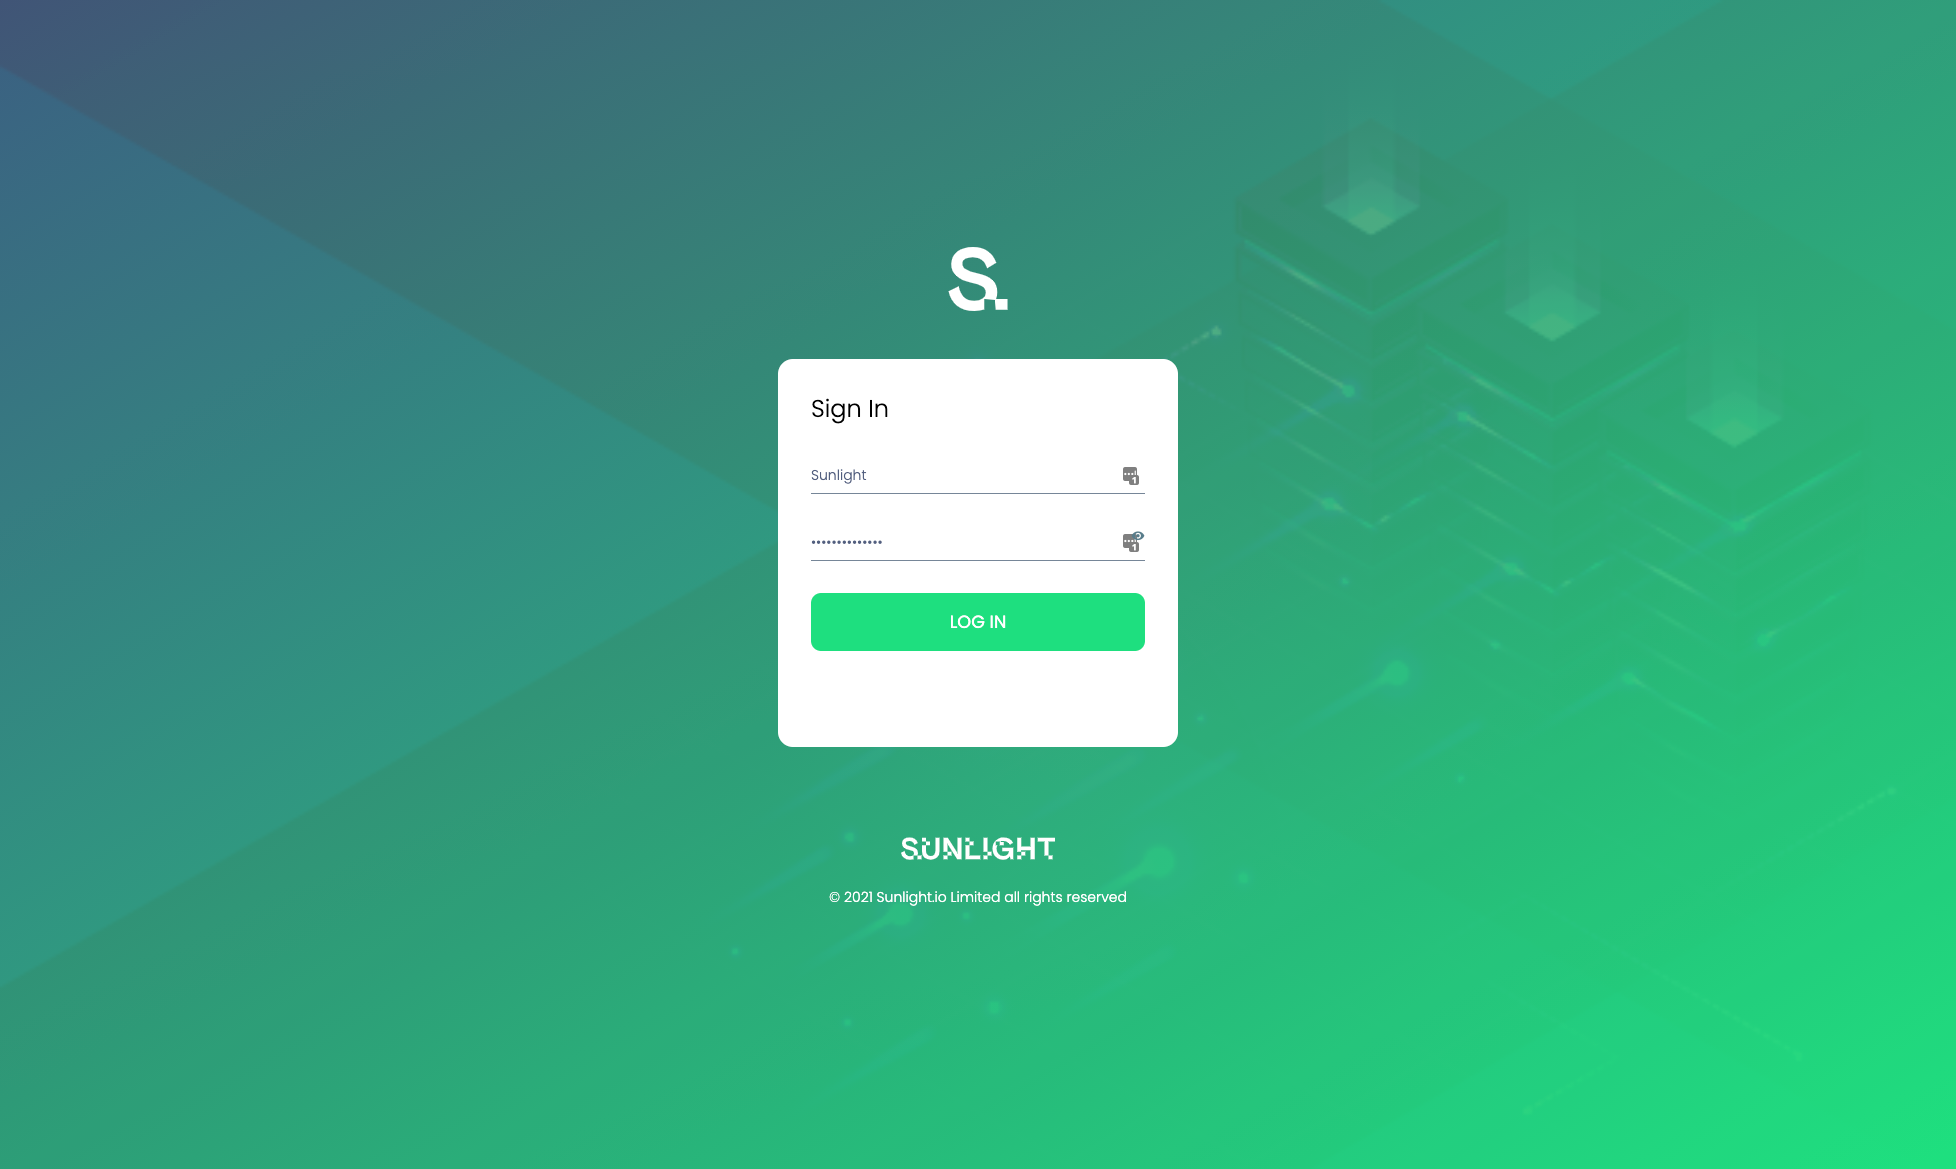
Enter the default username sunlight. The password for your first time login is the AWS assigned instance ID you noted in the previous step from the AWS console.
The system immediately redirects the user to change the password on the first login:
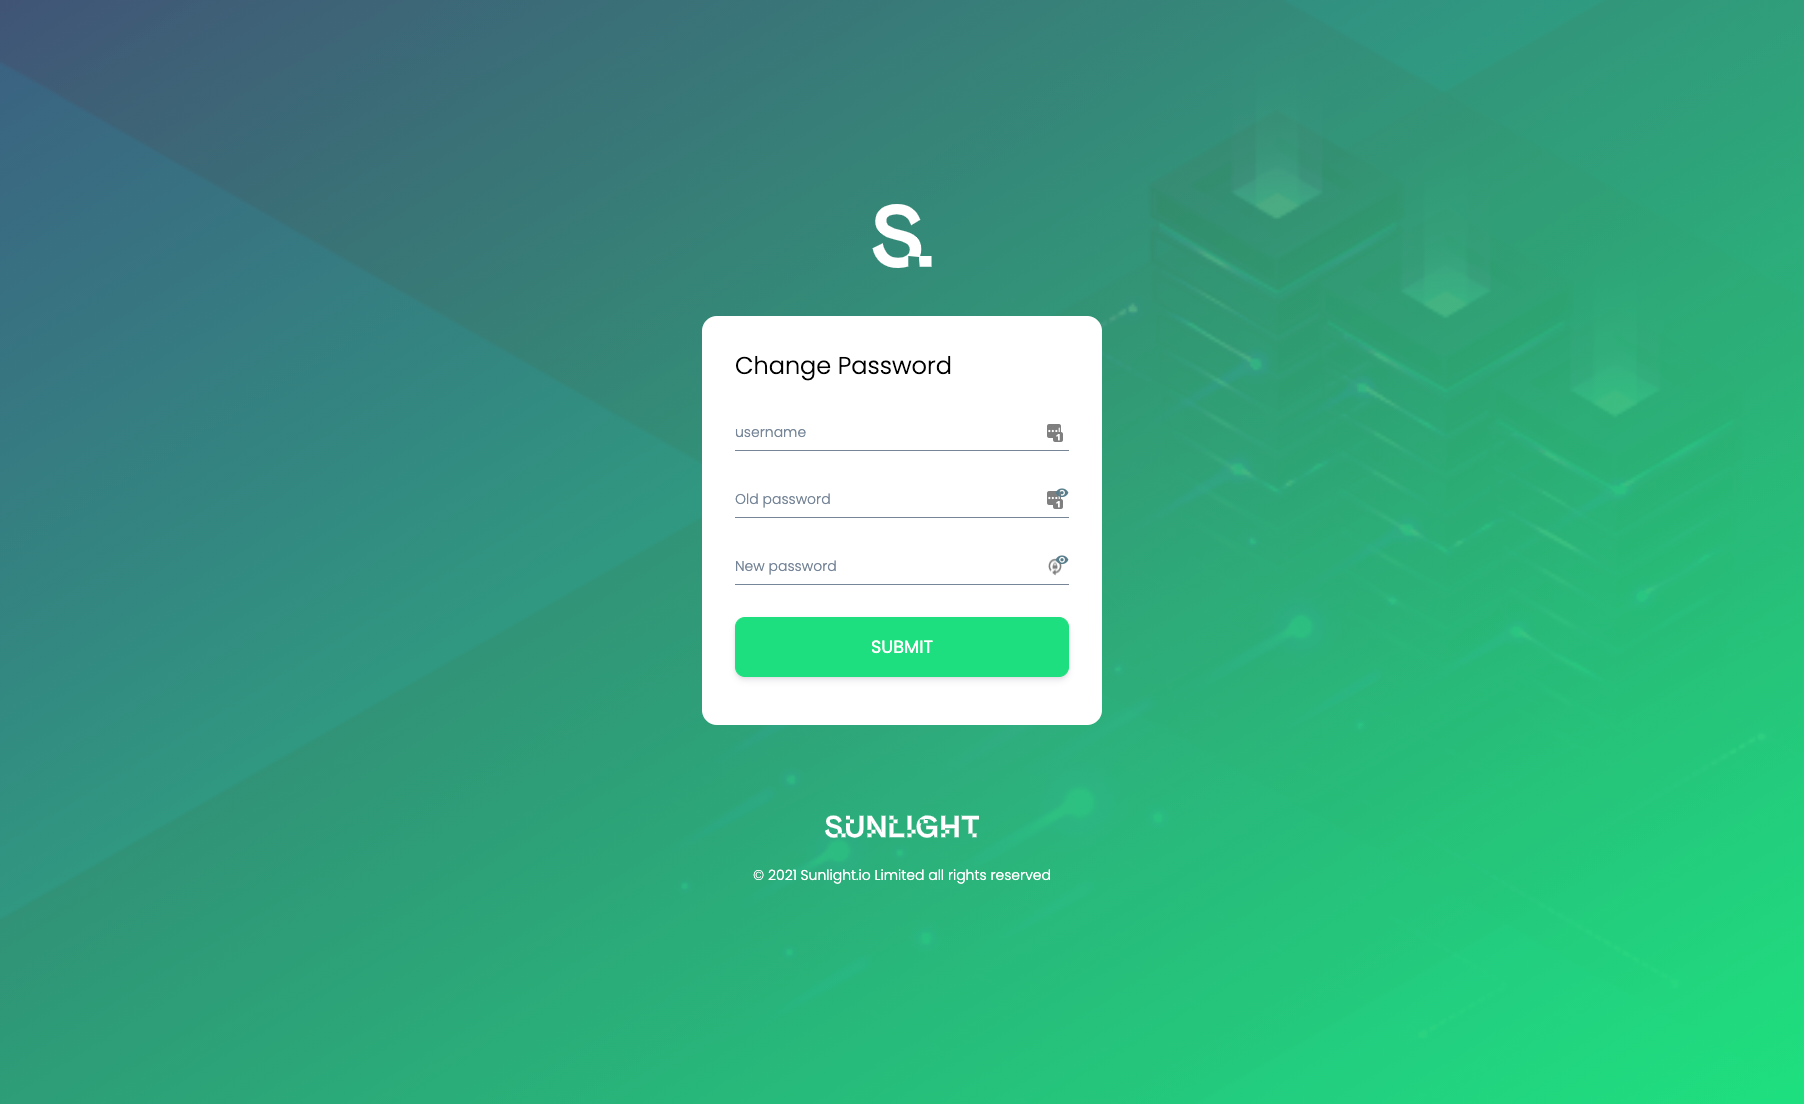
Following a successful password change, the system redirects the user to login again.
With a changed password, you should now be able to login and view the main dashboard.
At this point there are two types of Sunlight infrastructure clusters that you can now manage via the SIM :
(1.) Connect your on-premise Sunlight clusters, in order to access and manage them from the SIM over a secure tunnel.
How to connect the SIM with an on-premise cluster
(2.) Deploying and managing Sunlight clusters on-demand in AWS.
Note
The IAM role is required in both cases mentioned above.
Sunlight Platform Deployment
Now you are ready to start deploying and managing Sunlight hypervisor resources. Please review individual user guides through the following link, for information on how to achieve this in each environment:
How to create an AWS cluster with SIM
Note
The Sunlight support team is always available to assist with any installation and configuration issues you may encounter. Link : support portal
Optional post-install steps
Following are some optional post install steps that are recommended by Sunlight in order to secure your SIM dashboard with an SSL certificate and allow https secure connections to the dashboard.
STEP 1 - Assign an elastic IP to the SIM
In order to assign an SSL certificate it is necessary to have a DNS name and a static IP address configured for your SIM instance. AWS assigns a static IP address by default, but having the same IP address after a reboot in not guaranteed, so this is not sufficient for the purposes of generating a permanent SSL certificate.
To generate an SSL certificate you must create a domain/subdomain entry via your DNS service. If you are unfamiliar with DNS record assignment, please contact the Sunlight support team for assistance.
It is suggested that you wait for full DNS propagation before attempting to run step 2, to avoid SSL issue problems, otherwise you can continue using the IP address assigned.
STEP 2 - Assign the new domain name and generate an SSL certificate
In this step you can proceed to 'Settings' in the SIM UI in order to input the domain/subdomain assigned to the elastic IP and configure the manager to respond under https to that domain/subdomain url request.
By clicking on 'Settings' you should be able to view the following screen:
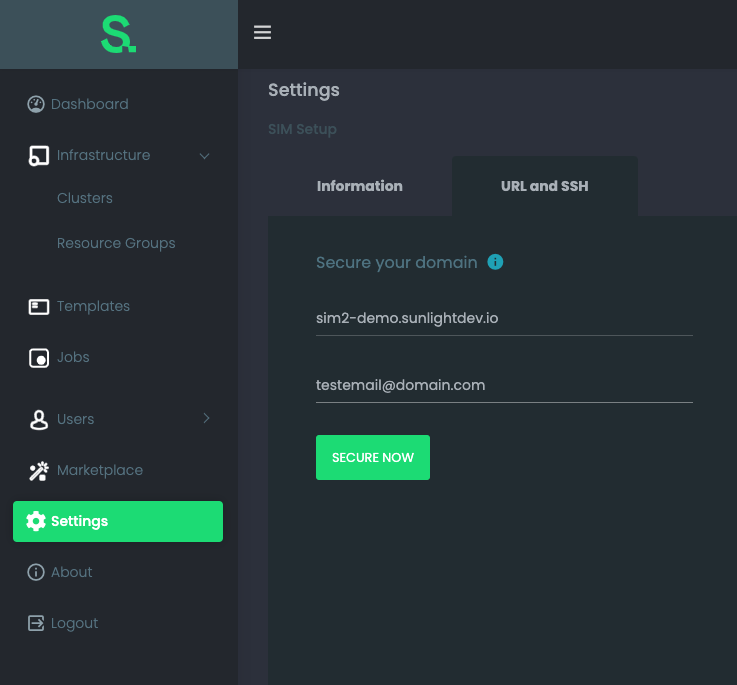
The important configuration step here is to insert the domain/subdomain selected in step 1, as well as a verification email, in order for the proper SSL to be issued.
If this step concludes successfully then your web browser URL will be changed to the one that has just been secured and the Sunlight Infrastructure Manager will be available under a https connection.